ESP32-S3 Driving WS2812 LED Ring Rainbow Flow Rotation Effect — Complete Tutorial
Difficulty: 2/5 (beginner-friendly) Estimated Time: 30 minutes Tested with: Arduino IDE 2.3.8 + FastLED v3.10.3 + ESP32 Arduino Core 3.3.8
TL;DR (Quick Start):
- Wiring: WS2812 ring
DIN→ ESP32-S3GPIO40,VCC→ 5V,GND→ GND- Install library: Search for
FastLED(by Daniel Garcia) in the Arduino Library Manager, install the latest version- Adjust
NUM_LEDS(LED count) andLED_PIN(pin number) in the code as needed- Upload, power on, and the ring starts spinning
Introduction
I’ve had a WS2812 LED ring lying around at home, waiting for “when I have free time” to play with it. But seeing it gather dust for so long, I decided to dust it off and put together a simple demo.
The most brilliant thing about WS2812 strips/rings/matrices is that the entire setup only requires a single data line. Combined with power, that’s just 3 wires total. Each LED can be individually color-controlled thanks to the built-in driver chip. No decoders, no shift registers — just a few dozen lines of code and you’re done.
The goal of this tutorial: use an ESP32-S3 + FastLED library to create a rainbow color rotation flow effect around the ring. The entire implementation is non-blocking, leaving room for future feature expansion.
Result
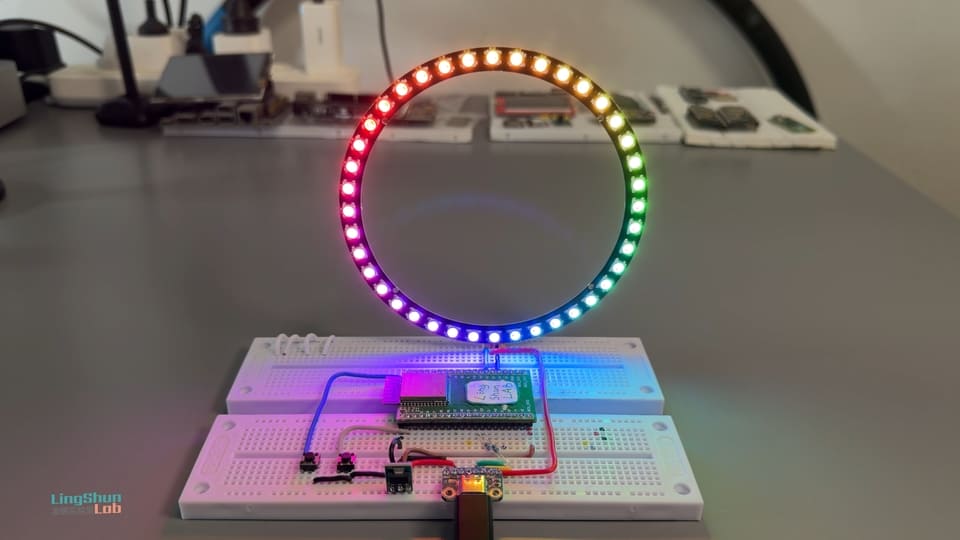
40 LEDs on the ring light up simultaneously with colors distributed in a rainbow gradient. The overall hue continuously rotates, creating the illusion of a ring of colorful light flowing around.
---
Component Overview
WS2812 LED Ring
Think of the WS2812 ring like a bucket brigade — you send all the data to the first LED, it keeps the color info meant for itself, and passes the rest to the next one. The next LED does the same, and so on down the chain. This daisy-chain approach means a single wire can control dozens (or even hundreds) of LEDs, each displaying its own color.
Example: Data instruction stream: [Red, Blue, Green, Yellow]
         ↓
   LED 1 takes "Red", lights up red → passes [Blue, Green, Yellow] to the next
         ↓
   LED 2 takes "Blue", lights up blue → passes [Green, Yellow] to the next
         ↓
   LED 3 takes "Green", lights up green → passes [Yellow] to the next
   ...
   ...
...| Parameter | Value |
|---|---|
| Drive Voltage | 5V |
| Max Current per LED | 60mA (20mA per R/G/B channel, all on) |
| Data Signal Level | Compatible with 3.3V logic (no level shifter needed) |
| Communication Protocol | Single-wire NZR (Non-Return-to-Zero) |
| Color Order | GRB |
| Refresh Rate | 400Hz / 800Hz (depending on model) |
Why choose this: Minimal wiring (one data line), native FastLED support, extensive community resources, and beginner-friendly with few pitfalls.
How many LEDs can a single WS2812B data line (one GPIO) theoretically and practically drive?
Theoretical Limit
There is virtually no hard limit (you can drive thousands or even tens of thousands). WS2812B uses a daisy-chain topology — the DO pin of each LED connects to the DI pin of the next, passing data down the line one by one. As long as the microcontroller can send a complete data frame in time, you can theoretically chain them indefinitely.
Practical Recommended Counts (Single Data Line)
| Use Case | Recommended Max Count | Notes |
|---|---|---|
| Smooth animation / gaming (high refresh) | 300~600 LEDs | Recommended range, refresh rate stays above 30~60fps |
| General effects / ambient lighting | 800~1200 LEDs | Common upper limit, refresh rate around 15~30fps |
| Extreme cases | 2000~4000+ LEDs | Feasible, but refresh rate drops very low (<10fps), signal issues likely |
| Professional / large-scale projects | Thousands to tens of thousands | Must use multiple data lines in parallel (ESP32 is great for this) |
Main Limiting Factors
- Refresh rate (most critical) Each LED requires ~30μs of data (24 bits).
- 1000 LEDs ≈ 30ms → ~33fps
- 2000 LEDs ≈ 60ms → ~16fps (noticeable stuttering)
- Signal quality
- Data lines that are too long (>10~15 meters) or too many LEDs can cause glitching, random colors, or flickering on the tail-end LEDs.
- Recommended to add a signal amplifier (74HCT245 / SN74AHCT125, etc.) or repeater module every 500~1000 LEDs.
- Power supply (not a data line limitation, but must be addressed)
- Each LED at full white draws up to
60mA (typically 2030mA average). - You must inject power at multiple points (every 1~2 meters), otherwise voltage drop causes the far end to dim or shift color.
- Each LED at full white draws up to
BOM
| Component | Specification | Quantity |
|---|---|---|
| ESP32-S3 development board | Any version with GPIO pins | x1 |
| WS2812 LED ring | 40 LEDs (or other count — just change one line in code) | x1 |
| Jumper wires | Male-to-female / male-to-male, as needed | Several |
Component Pin Reference
The WS2812 LED ring typically has the following 4 pins:
| Pin Label | Description |
|---|---|
| VCC / 5V | Power positive, connect to 5V |
| GND | Power ground, connect to GND |
| DIN / Data In | Data input, connect to ESP32-S3 GPIO |
| DOUT / Data Out | Data output, used when daisy-chaining multiple rings — not used in this project |
Note: Some rings are only labeled
+,-, andData— the mapping is the same, don’t let that throw you off.
Wiring
| WS2812 Ring Pin | ESP32-S3 |
|---|---|
| VCC / 5V | 5V (board 5V pin or external 5V supply) |
| GND | GND |
| DIN | GPIO40 |
Tip: Double-check every connection after wiring — this saves 80% of troubleshooting time. Make sure VCC is NOT connected to 3.3V. The LEDs will still light up, but colors will be off and brightness reduced, wasting your debugging time.
Required Library
In the Arduino IDE Library Manager, search for FastLED by Daniel Garcia and install the latest version (tested version for this article: v3.10.3).
Installation path: Tools → Manage Libraries → search FastLED → Install
Complete Code
/*
 * ESP32-S3 WS2812 Rainbow Flow Rotation Ring
 * FastLED non-blocking version — doesn't block loop(), easy to add buttons, sensors, etc. later
 */

#include <FastLED.h>

// ===== Modify these to match your setup =====
#define LED_PIN     40       // GPIO pin connected to data line
#define NUM_LEDS    40       // Number of LEDs on the ring
#define BRIGHTNESS  204      // Global brightness, range 0 (off) ~ 255 (full)
// =============================================

#define LED_TYPE    WS2812B
#define COLOR_ORDER GRB      // WS2812 color order is GRB, not RGB — don't mix this up

CRGB leds[NUM_LEDS];         // Color array for each LED

uint8_t gHue = 0;            // Rainbow starting hue, incremented each frame for "rotation" effect

void setup() {
    // Step 1: Give hardware 1 second to stabilize, avoid power-on current surge causing LED flicker
    delay(1000);

    // Step 2: Initialize FastLED — tell it which pin, which LED type, and how many
    FastLED.addLeds<LED_TYPE, LED_PIN, COLOR_ORDER>(leds, NUM_LEDS)
           .setCorrection(TypicalLEDStrip);  // Auto color temperature correction, makes white look whiter

    // Step 3: Set global brightness (easier than adjusting RGB values)
    FastLED.setBrightness(BRIGHTNESS);
}

void loop() {
    // Step 4: Fill the entire ring with a rainbow gradient
    // gHue is the starting hue, 255/NUM_LEDS is the hue spacing between each LED
    fill_rainbow(leds, NUM_LEDS, gHue, 255 / NUM_LEDS);

    // Step 5: Push color data to the LED ring
    FastLED.show();

    // Step 6: Increment hue by 1 every 10ms — smaller value = faster rotation, larger = slower
    EVERY_N_MILLISECONDS(10) {
        gHue++;
    }
}
Code Walkthrough
| Key Line | What It Does |
|---|---|
fill_rainbow(...) | Built-in FastLED function that automatically calculates rainbow gradient colors and fills the array — no manual HSV math needed |
FastLED.show() | Sends the color data from the leds[] array through GPIO40 — LEDs won’t update until this is called |
EVERY_N_MILLISECONDS(10) | Built-in FastLED non-blocking timer, equivalent to “execute once every 10ms” — won’t block loop() |
gHue++ | Increments the hue by 1 each time, shifting the starting color of fill_rainbow for the next frame, creating the rotation effect |
setCorrection(TypicalLEDStrip) | Auto-corrects LED color temperature so mixed white doesn’t look greenish — ideal for WS2812 |
To change rotation speed: adjust the number inside
EVERY_N_MILLISECONDS(10). 10 → 5 doubles the speed, 10 → 20 halves it.
Troubleshooting
Don’t panic — 90% of issues come down to these:
Issue 1: LEDs don’t light up at all after power-on
- Check that DIN is connected to
GPIO40(the pin defined byLED_PINin code) - Confirm VCC is connected to 5V, not 3.3V
- Check that GND is connected — without a shared ground, data signals can’t be transmitted
Issue 2: Only some LEDs light up, or colors flash randomly
- Most likely insufficient power. 40 LEDs at full white draw up to 2.4A — a USB port’s 500mA can’t handle that. Use an external 5V 2A+ power supply
Issue 3: Colors look wrong — red appears as green
COLOR_ORDERis defined incorrectly. WS2812B uses GRB order. Try changingGRBtoRGBin the code, or vice versa
Issue 4: Compile error FastLED.h: No such file
- The library isn’t installed. Re-open the Library Manager, confirm FastLED shows “Installed”, then restart Arduino IDE
Issue 5: Upload succeeds but LEDs don’t animate
- Check that
NUM_LEDSmatches the actual LED count on your ring — a mismatch will cause display issues
FAQ
Q: What’s the difference between WS2812 and WS2812B? Is the code interchangeable?
A: WS2812B is an upgraded version of WS2812 with a smaller package and slightly adjusted timing. FastLED supports both. Just set LED_TYPE to WS2812B — no other code changes needed.
Q: My ring only has 12/16/24 LEDs. How do I modify the code?
A: Just change one line: #define NUM_LEDS 24 — replace with your actual LED count. Everything else stays the same.
Q: Can I use a different pin instead of GPIO40?
A: Yes. Most ESP32-S3 GPIO pins work (avoid boot-related pins like 0, 3, 45, 46). Just change the number in #define LED_PIN 40 and wire to the corresponding pin.
Q: Can I drive multiple rings simultaneously?
A: Yes. Connect each ring to a separate GPIO, call addLeds once more in your code, and assign different leds[] array segments for each.
Q: Does the ring need a separate power supply? A: If you have 8 or fewer LEDs and brightness isn’t maxed out, the development board’s 5V pin can handle it. For more than 8 LEDs or full white output, an external 5V 2A+ power supply is strongly recommended. Make sure the external supply’s GND is connected to the board’s GND (shared ground).
Q: What is EVERY_N_MILLISECONDS? Why not just use delay()?
A: EVERY_N_MILLISECONDS is a non-blocking timer built into FastLED. The loop() runs normally, and only the code inside the block executes at the specified interval. With delay(), the entire program stalls and can’t simultaneously handle buttons, serial input, or other tasks.
Q: Can I reverse the rotation direction?
A: Yes — just change gHue++ to gHue-- and it rotates in the opposite direction.
Going Further
- Add a button to switch between effects (breathing / marquee / rainbow flow on the fly)
- Connect a microphone module for audio-reactive LED spectrum effects
- Daisy-chain multiple rings — connect DIN to the previous ring’s DOUT for a longer strip effect
- Add an OLED screen to display the current effect name and brightness value