TL;DR: Use ESP32-S3 to read and write a Micro SD card over SPI. From wiring to a serial file listing in 30 minutes.
ESP32-S3 Micro SD Card Module Complete Tutorial (SPI Mode + Arduino Code)
Difficulty: 2/5 (some basics needed) Estimated time: 30 minutes Tested on: Arduino IDE 2.3.x + ESP32 Arduino Core 3.x
TL;DR (quick-start version):
- Wiring: GPIO5 -> CMD (MOSI), GPIO13 -> D0 (MISO), GPIO14 -> CLK, GPIO4 -> D3 (CS)
- Power with 3.3V, not 5V
- Format the SD card as FAT32 (especially important for 32GB cards)
- Use the built-in
SD.hlibrary — no extra installation needed- Flash the code, open Serial Monitor (115200), and you should see the file listing
Introduction
Halfway through an ESP32 project, you’ve probably run into this problem:
You want to play audio, store a ton of sensor data, or load some images… and then realize the ESP32’s built-in flash just isn’t enough.
The simplest fix is to add an SD card. Storage goes from a few MB to tens of GB in one move, and the read/write speed is more than adequate. This guide walks you through getting ESP32-S3 + Micro SD card module up and running from scratch, using SPI mode to read the file listing from a 32GB SD card.
Wire it up, flash the code, and within 30 minutes you should see your SD card’s file names in the Serial Monitor.
Demo
The serial output looks something like this:
=== ESP32-S3 SD SPI Test ===
MOSI=5, MISO=13, SCK=14, CS=4
SD card mounted successfully.
SD Card Type: SDHC
SD Card Size: 30436MB
Total space: 30436MB
Used space : 512MB
Listing directory: /
  DIR : music
  FILE: readme.txt  SIZE: 128
  FILE: config.json  SIZE: 256
Module Overview
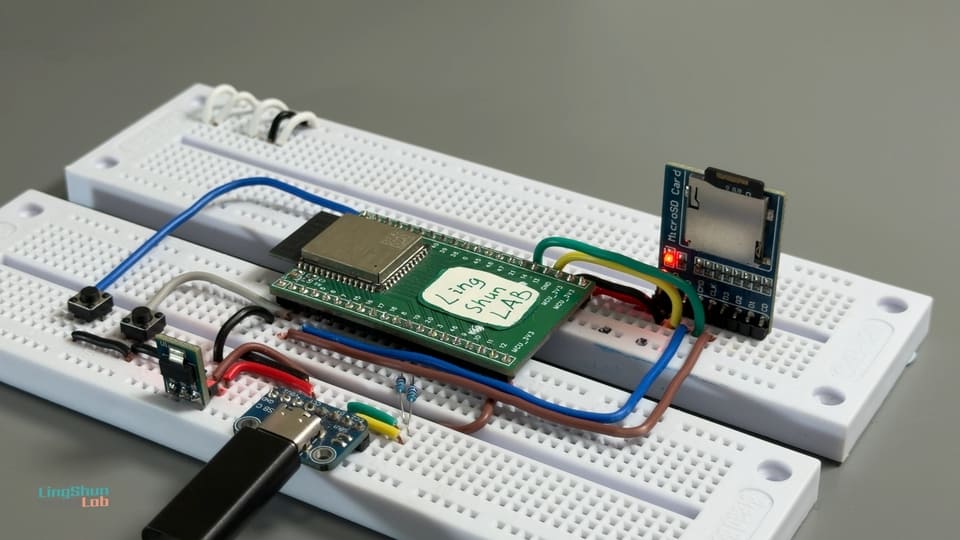
Think of the SD card module as a “card reader” for your ESP32. The ESP32 doesn’t have a built-in SD card slot, so this little module acts as a bridge — it translates the ESP32’s SPI signals into the protocol the SD card understands, turning your SD card into freely readable/writable external storage.
| Parameter | Specification |
|---|---|
| Interface protocol | SPI mode / SDIO mode (this guide uses SPI) |
| Supported card types | Micro SD (SDSC / SDHC, up to 32GB) |
| Operating voltage | 3.3V (do NOT connect 5V — it can damage the module or card) |
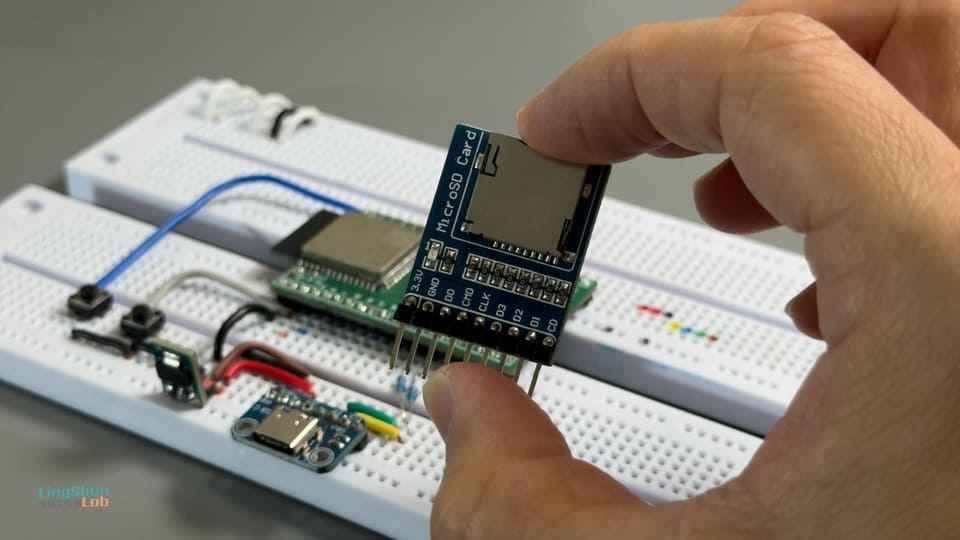
| Pin count | CMD / CLK / D0 / D1 / D2 / D3 / 3.3V / GND |
| Pins used in SPI mode | CMD (MOSI) / D0 (MISO) / CLK / D3 (CS) |
Why this module? It’s compact, needs only 4 signal lines in SPI mode, and is the most common way to add external storage to an ESP32. There’s also plenty of community documentation and troubleshooting info available online.
BOM
| Component | Qty | Notes |
|---|---|---|
| ESP32-S3 development board | 1 | Any S3 board with GPIO pins works |
| Micro SD card module | 1 | Must support SPI mode (usually labeled on the back) |
| Micro SD card | 1 | 32GB or less recommended, formatted as FAT32 |
| Jumper wires (Dupont) | Several | Male-to-female, keep them short |
Wiring Guide
| ESP32-S3 Pin | SD Module Pin | Description |
|---|---|---|
| 3.3V | 3.3V | Use 3.3V only, NOT 5V |
| GND | GND | Common ground — must be connected |
| GPIO13 | D0 | SPI MISO: SD card sends data back to ESP32 |
| GPIO5 | CMD | SPI MOSI: ESP32 sends data to SD card |
| GPIO14 | CLK | SPI clock, driven by ESP32 |
| GPIO4 | D3 | SPI Chip Select (CS) — card is selected when LOW |
| Not connected | D1 / D2 / CD | Not needed in SPI mode, leave unconnected |
After wiring, double-check every connection against the table above — this alone saves you 80% of troubleshooting time. Also, keep your Dupont wires short (under 30cm for best results). Longer wires cause signal integrity issues, and 32GB cards are more timing-sensitive.
Required Libraries
None to install!
The SPI.h and SD.h libraries used in this guide are both built into the ESP32 Arduino Core. As long as your Arduino IDE has the ESP32 board support package installed, you’re good to go.
If you haven’t installed the board package yet, go to Arduino IDE -> Tools -> Board Manager, search for esp32, and install the package from Espressif Systems (tested version: ESP32 Arduino Core 3.0.x).
Complete Code
#include <SPI.h>
#include <SD.h>

// Step 1: Define SPI pins
static const int SD_MOSI = 5;   // Maps to SD module CMD
static const int SD_MISO = 13;  // Maps to SD module D0
static const int SD_SCK  = 14;  // Maps to SD module CLK
static const int SD_CS   = 4;   // Maps to SD module D3 (chip select)

SPIClass spi = SPIClass(FSPI);  // Use FSPI bus on ESP32-S3

// Recursively list all files and subdirectories
void listDir(fs::FS &fs, const char * dirname, uint8_t levels) {
  Serial.printf("Listing directory: %s\n", dirname);

  File root = fs.open(dirname);
  if (!root) {
    Serial.println("Failed to open directory — check wiring or SD card format");
    return;
  }
  if (!root.isDirectory()) {
    Serial.println("Not a directory");
    return;
  }

  File file = root.openNextFile();
  while (file) {
    if (file.isDirectory()) {
      Serial.print("  [DIR]  ");
      Serial.println(file.name());
      if (levels) {
        listDir(fs, file.path(), levels - 1);  // Recurse into subdirectory
      }
    } else {
      Serial.print("  [FILE] ");
      Serial.print(file.name());
      Serial.print("    Size: ");
      Serial.print(file.size());
      Serial.println(" bytes");
    }
    file = root.openNextFile();
  }
}

// Print SD card basic info
void printCardInfo() {
  uint8_t cardType = SD.cardType();

  if (cardType == CARD_NONE) {
    Serial.println("No SD card detected — check wiring and power");
    return;
  }

  Serial.print("SD card type: ");
  if      (cardType == CARD_MMC)  Serial.println("MMC");
  else if (cardType == CARD_SD)   Serial.println("SDSC");
  else if (cardType == CARD_SDHC) Serial.println("SDHC (Standard High Capacity)");
  else                            Serial.println("Unknown type");

  uint64_t cardSize   = SD.cardSize()   / (1024 * 1024);
  uint64_t totalBytes = SD.totalBytes() / (1024 * 1024);
  uint64_t usedBytes  = SD.usedBytes()  / (1024 * 1024);

  Serial.printf("Card size:  %llu MB\n", cardSize);
  Serial.printf("Total space: %llu MB\n",  totalBytes);
  Serial.printf("Used space:  %llu MB\n",  usedBytes);
}

void setup() {
  Serial.begin(115200);
  delay(1500);  // Wait for serial to stabilize

  Serial.println();
  Serial.println("=== ESP32-S3 SD SPI Test ===");
  Serial.printf("MOSI=%d, MISO=%d, SCK=%d, CS=%d\n",
                SD_MOSI, SD_MISO, SD_SCK, SD_CS);

  // Step 2: Initialize SPI bus with custom pins — order: SCK, MISO, MOSI, CS
  spi.begin(SD_SCK, SD_MISO, SD_MOSI, SD_CS);

  // Step 3: Pull CS high to avoid accidentally selecting the SD card during init
  pinMode(SD_CS, OUTPUT);
  digitalWrite(SD_CS, HIGH);

  // Step 4: Mount the SD card at 10MHz SPI clock (lower to 4MHz if unstable)
  if (!SD.begin(SD_CS, spi, 10000000)) {
    Serial.println("SD card mount failed! Check the following:");
    Serial.println("1. Wiring: GPIO5->CMD / GPIO13->D0 / GPIO14->CLK / GPIO4->D3");
    Serial.println("2. Power: confirm 3.3V, not 5V");
    Serial.println("3. SD card: format as FAT32");
    Serial.println("4. Change 10000000 to 4000000 to lower SPI frequency and retry");
    return;
  }

  Serial.println("SD card mounted successfully!");
  printCardInfo();

  // Step 5: List file structure up to 5 levels deep from root
  listDir(SD, "/", 5);
}

void loop() {
  // File reading is done once in setup(); loop is empty for now
  // Add delay + listDir here if you need periodic polling
}
File Operation Extensions
Once the main program works, just listing files isn’t enough. The functions below don’t modify the main program — just paste them next to listDir() in your sketch, then call them at the end of setup() as needed. They cover read / write / append / create / delete / rename — all the common operations.
Write File — Overwrite and Append
FILE_WRITE mode clears the file before writing; FILE_APPEND mode writes from the end of the file. For logging or sensor data collection, you’ll almost always use append mode.
// === Write file (overwrite mode) ===
// Creates the file if it doesn't exist; clears existing content before writing
void writeFile(fs::FS &fs, const char * path, const char * message) {
  Serial.printf("Writing file: %s\n", path);

  File file = fs.open(path, FILE_WRITE);  // FILE_WRITE mode: overwrite
  if (!file) {
    Serial.println("Failed to open file for writing");
    return;
  }

  if (file.print(message)) {
    Serial.println("Write successful");
  } else {
    Serial.println("Write failed");
  }
  file.close();  // Always close the file, or data may not be flushed to the card
}

// === Append to file (no overwrite) ===
// Great for logging: appends a new line to the end of the file each time
void appendFile(fs::FS &fs, const char * path, const char * message) {
  Serial.printf("Appending to: %s\n", path);

  File file = fs.open(path, FILE_APPEND);  // FILE_APPEND mode: append
  if (!file) {
    Serial.println("Failed to open file for appending");
    return;
  }

  if (file.print(message)) {
    Serial.println("Append successful");
  } else {
    Serial.println("Append failed");
  }
  file.close();
}

// Usage examples (place in setup() after listDir):
// writeFile(SD, "/hello.txt", "Hello ESP32-S3 SD!\n");
// appendFile(SD, "/hello.txt", "This is the second line appended\n");
Performance tip: Every file.close() triggers a physical write to the SD card, so opening and closing files frequently is slow. For high-frequency logging, keep the File instance open and call file.flush() every N lines to flush the buffer to the card.
Read File — Full Read and Line-by-Line
readFile() works well for small files you want to read all at once; readFileByLine() is better for structured text like CSV or config files.
// === Read file (read all at once, print byte by byte) ===
void readFile(fs::FS &fs, const char * path) {
  Serial.printf("Reading file: %s\n", path);

  File file = fs.open(path);  // Default is FILE_READ mode
  if (!file) {
    Serial.println("Failed to open file — it may not exist");
    return;
  }

  Serial.print("File content: ");
  while (file.available()) {
    Serial.write(file.read());  // Read and print byte by byte
  }
  Serial.println();
  file.close();
}

// === Read file line by line (good for config files, CSV data) ===
void readFileByLine(fs::FS &fs, const char * path) {
  Serial.printf("Reading line by line: %s\n", path);

  File file = fs.open(path);
  if (!file) {
    Serial.println("Failed to open file");
    return;
  }

  int lineNum = 1;
  while (file.available()) {
    String line = file.readStringUntil('\n');  // Read until newline
    Serial.printf("Line %d: %s\n", lineNum++, line.c_str());
  }
  file.close();
}

// Usage examples:
// readFile(SD, "/hello.txt");
// readFileByLine(SD, "/config.txt");
Note: file.available() returns the number of remaining bytes; file.readStringUntil('\n') reads everything up to the newline into a String. For large files, avoid String (it can cause memory fragmentation) — use a fixed-size char buf[128] with file.readBytesUntil() instead.
Create / Delete / Rename
Directory creation/deletion, empty file creation, file deletion, and renaming (which can also be used to “move” files).
// === Create directory ===
void createDir(fs::FS &fs, const char * path) {
  Serial.printf("Creating directory: %s\n", path);
  if (fs.mkdir(path)) {
    Serial.println("Directory created successfully");
  } else {
    Serial.println("Failed to create directory (may already exist or parent directory missing)");
  }
}

// === Create empty file ===
// Opening with FILE_WRITE and then closing creates an empty file
void createEmptyFile(fs::FS &fs, const char * path) {
  Serial.printf("Creating empty file: %s\n", path);
  File file = fs.open(path, FILE_WRITE);
  if (!file) {
    Serial.println("Failed to create file");
    return;
  }
  file.close();
  Serial.println("Empty file created successfully");
}

// === Delete file ===
void deleteFile(fs::FS &fs, const char * path) {
  Serial.printf("Deleting file: %s\n", path);
  if (fs.remove(path)) {
    Serial.println("File deleted successfully");
  } else {
    Serial.println("Delete failed (file may not exist or permission issue)");
  }
}

// === Delete directory (must be empty) ===
void removeDir(fs::FS &fs, const char * path) {
  Serial.printf("Removing directory: %s\n", path);
  if (fs.rmdir(path)) {
    Serial.println("Directory removed successfully");
  } else {
    Serial.println("Remove failed (directory not empty or does not exist)");
  }
}

// === Rename / move file ===
void renameFile(fs::FS &fs, const char * oldPath, const char * newPath) {
  Serial.printf("Renaming: %s -> %s\n", oldPath, newPath);
  if (fs.rename(oldPath, newPath)) {
    Serial.println("Rename successful");
  } else {
    Serial.println("Rename failed");
  }
}

// Usage examples (run in order for a complete demo):
// createDir(SD, "/logs");
// createEmptyFile(SD, "/logs/empty.txt");
// renameFile(SD, "/logs/empty.txt", "/logs/data.txt");
// deleteFile(SD, "/logs/data.txt");
// removeDir(SD, "/logs");
Important: SD.rmdir() can only delete empty directories. To recursively delete an entire directory tree, you need to traverse and delete all files first, then delete the directory itself. The SD.h library doesn’t have a built-in rm -rf — you’d need to write your own recursive function.
Code Notes
Why does CMD map to MOSI? In SPI mode, data sent from the ESP32 to the SD card goes through the CMD pin, so CMD = MOSI. This is defined by the SD specification for SPI mode — it’s not a wiring mistake.
Why does D0 map to MISO? In SPI mode, the SD card sends data back to the host through the D0 pin, so D0 = MISO.
Why does D3 map to CS? After entering SPI mode, the D3 pin takes on the Chip Select function — the card is activated when D3 is pulled LOW.
Why are D1 and D2 left unconnected? They’re used exclusively in 4-bit SDIO mode. SPI mode doesn’t need them, so just leave them floating.
What does SPIClass spi = SPIClass(FSPI) mean?
The ESP32-S3 has multiple SPI buses (FSPI / HSPI). Here we explicitly choose FSPI to avoid conflicts with other peripherals.
Troubleshooting
Don’t panic — 90% of initialization failures come down to a few common issues. Check these in order and you’ll likely find the problem:
1. Stuck at “SD card mount failed”? First, verify your wiring: GPIO5->CMD, GPIO13->D0, GPIO14->CLK, GPIO4->D3. Any single miswire will cause failure.
2. Wiring looks correct, still failing? Lower the SPI frequency from 10MHz to 4MHz by changing this line:
if (!SD.begin(SD_CS, spi, 4000000)) {32GB cards are more timing-sensitive. A lower frequency is more likely to work — once it’s stable, you can gradually increase it.
3. No serial output at all? Check that the baud rate is set to 115200, and make sure your USB cable supports data transfer (charge-only cables won’t work).
4. Intermittent mount failures — works sometimes, not others? Likely a power issue. Long wires or poor contacts can cause voltage drops during SD card initialization. Try shorter Dupont wires or use better quality ones.
5. 32GB card fails but 8GB works fine?
32GB cards are typically SDHC and often come formatted as exFAT (Windows defaults to exFAT for 32GB cards). The ESP32’s SD.h doesn’t support exFAT — you need to reformat as FAT32. Use SD Card Formatter for best results.
6. Mount succeeds but listDir shows no files? The SD card might be empty, or all files could be in hidden folders. Put a .txt file on the card and test again.
FAQ
Q: My SD card module is 5V — can I use it with ESP32-S3? A: Not recommended. The ESP32-S3 GPIOs are 3.3V logic. If the module doesn’t have level shifting, connecting its signal lines directly to a 5V module can damage the pins. Make sure your module supports 3.3V operation, or get one with a built-in level shifter.
Q: What SPI frequency should I use?
A: Start at 4MHz (4000000). Once that works, try 10MHz (10000000). Theoretically, SD cards in SPI mode support up to 25MHz, but in practice the actual limit depends on your wire length and module quality — you probably won’t reach that high.
Q: Which ESP32-S3 GPIOs can I use instead for the SD card?
A: The ESP32-S3’s FSPI supports custom pin mapping, so most GPIOs should work. However, avoid GPIO0 (boot mode pin), GPIO45, and GPIO46 (they have fixed functions). After changing pins, remember to update the SD_MOSI / SD_MISO / SD_SCK / SD_CS constants in your code.
Q: Does a 32GB SD card have to be FAT32? What about exFAT?
A: The Arduino SD.h library only supports FAT16 and FAT32 — not exFAT. Cards 32GB and smaller formatted as FAT32 work fine. Use the SD Card Formatter tool rather than Windows’ built-in formatter (which defaults to exFAT for 32GB cards).
Q: What’s the approximate SD card read/write speed? A: In SPI mode, actual throughput is roughly 500KB/s to 2MB/s, depending on the SPI clock frequency and the card’s speed class. If you need higher speeds, consider SDIO 4-bit mode (requires different wiring — beyond the scope of this guide).
Q: Can I mount multiple SD cards at the same time?
A: Yes. The SPI bus supports multiple devices — just use a different CS pin for each card and initialize them as separate SD instances. However, SD.h only supports a single instance, so for multiple cards you’d need SD_MMC.h or a third-party library like SdFat.
Q: Does this code use a lot of CPU on the ESP32-S3?
A: Not really. File listing is a one-time I/O operation that finishes in setup(), and loop() is empty, so CPU usage is essentially zero. You’d only need to think about performance if you’re continuously reading/writing files in loop().
What’s Next
Once you’ve got basic file reading working, here are some directions to explore:
- Play MP3 from SD card: Pair with the ESP32-audioI2S library and an I2S DAC to play audio files directly from the SD card — no more network buffering
- Data logging: Write sensor data to CSV files with timestamps — survives power loss and is easy to analyze with Python later
- TFT display integration: Read images (BMP/JPG) from the SD card and display them on screen for a DIY digital photo frame
- Config file loading: Store Wi-Fi credentials in a
config.jsonfile on the SD card so you don’t have to reflash the firmware every time