ESP32-S3 + $3 Color Screen Running LVGL Animations — Zero to Working in 10 Minutes (2026 Pitfall-Free Edition)
TL;DR: Drive a 0.96-inch ST7735S TFT with an ESP32-S3, add smooth LVGL animations — 5 core wiring connections and a complete troubleshooting guide included.
Final Result
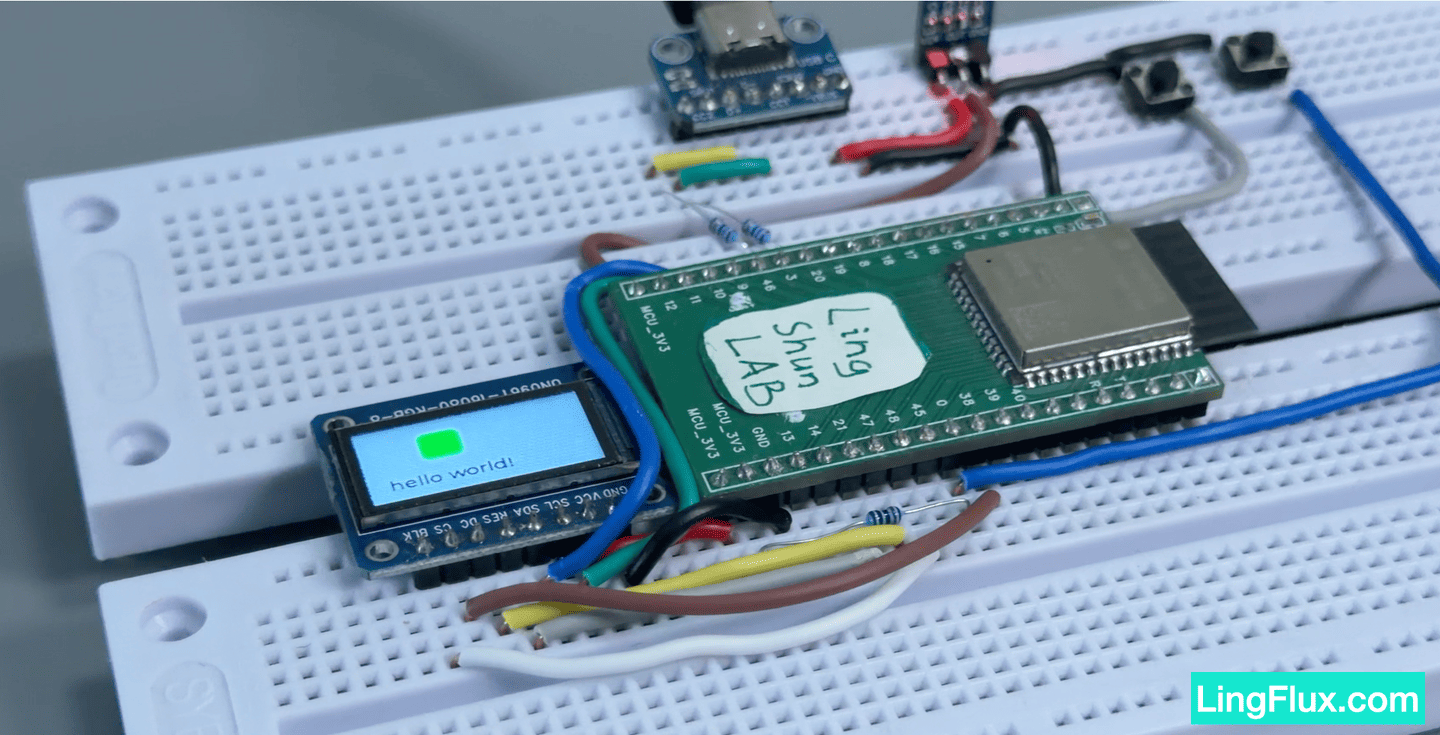
A screen the size of a thumbnail nail, running buttery-smooth LVGL animations. This guide covers everything from wiring to code, so you can skip straight past the common pitfalls.
What You’ll Learn
- How to drive a ST7735S 0.96-inch TFT over SPI with an ESP32-S3
- How to configure the Arduino_GFX library (and why it beats TFT_eSPI here)
- The full workflow for porting LVGL v9 to a small screen
- A dual-animation LVGL UI example (horizontal sweep + vertical bounce)
Bill of Materials
| Component | Qty | Notes |
|---|---|---|
| ESP32-S3 dev board | 1 | Any S3 variant works |
| 0.96” ST7735S TFT IPS display | 1 | 80×160 resolution, SPI, 8-pin |
| Dupont wires (female-to-female) | 8 | 8 wires is plenty |
Display Specs

You don’t need to memorize all of this — focus on the starred (*****) parameters, which are required when writing the code.
| Parameter | Spec | Notes |
|---|---|---|
| Size | 0.96” TFT IPS | Wide viewing angle, good color accuracy |
| Resolution | 80(H) × 160(V) | ***** In code: screenWidth=160, screenHeight=80 (landscape) |
| Driver IC | ST7735S | ***** Must match when choosing a library |
| Interface | 4-wire SPI | Up to 40MHz (start with the default speed) |
| Operating voltage | 3.3V | ***** Never connect 5V! |
| Pin count | 8-pin | Includes backlight control pin (BLK) |
| Parameter | Spec |
|---|---|
| Display area | 10.8(H) × 21.7(V) mm |
| Panel size | 19(H) × 24(V) × 2.7(D) mm |
| Pixel pitch | 0.135(H) × 0.1356(V) mm |
| Operating current | 20mA |
| Backlight type | 1 LED |
| Operating temp | -20 ~ 70°C |
| PCB size | 30.00 × 24.04 mm |
| Mounting hole dia. | 2 mm |
| Pin pitch | 2.54 mm |
Pin definitions:
| # | Pin | Function |
|---|---|---|
| 1 | GND | Ground |
| 2 | VCC | Power supply (3.3V) |
| 3 | SCL | SPI clock |
| 4 | SDA | SPI data (MOSI) |
| 5 | RES | Reset (active low) |
| 6 | DC | Register/data select (low = command, high = data) |
| 7 | CS | Chip select (active low) |
| 8 | BLK | Backlight (high = on; tie to 3.3V if not controlling) |
Wiring
| ESP32-S3 Pin | ST7735S Pin | Notes |
|---|---|---|
| GND | GND | Common ground |
| 3.3V | VCC | Never use 5V |
| GPIO 12 | SCL | SPI clock |
| GPIO 11 | SDA | SPI data (MOSI) |
| GPIO 21 | RES | Reset |
| GPIO 47 | DC | Command/data select |
| GPIO 38 | CS | Chip select |
| GPIO 48 | BLK | Backlight (or tie to 3.3V) |
Wiring Notes
- Power: 3.3V only — 5V will kill the display
- BLK backlight pin: If you don’t need software backlight control, just tie it to 3.3V for always-on
- CS chip select: Active low
- RES reset: Needs a low pulse during initialization
- Pin choice: These use the SPI2 (FSPI) default pins on ESP32-S3. If you change any pins, update the
#definemacros in the code accordingly
Library Installation
Install these two libraries in Arduino IDE:
- Arduino_GFX_Library — search for “GFX Library for Arduino”
- LVGL — search for
lvgland install v9.x
Why Arduino_GFX instead of TFT_eSPI?
To be clear — I’ve used TFT_eSPI a lot and it’s driven plenty of screens for me. Both libraries support the ST7735S, but their configuration approach is very different:
The TFT_eSPI problem: you have to edit library source files
TFT_eSPI requires you to open
User_Setup.hinside the library’s installation directory and manually edit pin definitions and driver selection. That means:
Tracking down the library path (varies by OS:
Documents/Arduino/libraries/or.platformio/packages/)Hunting through hundreds of lines to comment out defaults and uncomment the values you want
If you’re juggling multiple projects with different screens, you have to redo this every time you switch
Library updates wipe your config — your project suddenly fails to compile
The most common complaint — “I followed the tutorial exactly but I get a white screen” — almost always comes down to
User_Setup.hbeing wrong or not taking effect.The Arduino_GFX approach: everything lives in your sketch
With Arduino_GFX, all configuration is in your own
.inofile:// All pin and driver settings defined right in your code — no library files to touch Arduino_DataBus *bus = new Arduino_ESP32SPI(TFT_DC, TFT_CS, TFT_SCLK, TFT_MOSI, GFX_NOT_DEFINED); Arduino_GFX *gfx = new Arduino_ST7735(bus, TFT_RST, ROTATION, false, 80, 160, 26, 1, 26, 1);
Change pins? Update one
#defineChange screens? Swap
Arduino_ST7735forArduino_ILI9341or whichever driver you needLibrary update? Your code is untouched
Multiple projects? Each has its own config, completely isolated
Additionally, TFT_eSPI has known compatibility issues with ESP32-S3 — there are multiple GitHub issues reporting compile failures under ESP32 Arduino Core 3.x. Arduino_GFX is actively maintained and has better support for newer chips.
Development Environment
MacOS - v15.1.1
Arduino IDE - v2.3.8
Board package: esp32 (by Espressif Systems) - v3.3.7
Display driver: GFX Library for Arduino (by Moon on our nation) - v1.6.5
Graphics library: LVGL (by kisvegabor) - v9.5.0
Full Code
#include <Arduino_GFX_Library.h>
#include <lvgl.h>

// --- Pin definitions & GFX initialization ---
#define TFT_CS 38
#define TFT_RST 21
#define TFT_DC 47
#define TFT_MOSI 11
#define TFT_SCLK 12
#define TFT_BLK 48

#define BLACK   0x0000
#define WHITE   0xFFFF
#define ROTATION 1

Arduino_DataBus *bus = new Arduino_ESP32SPI(TFT_DC, TFT_CS, TFT_SCLK, TFT_MOSI, GFX_NOT_DEFINED);
Arduino_GFX *gfx = new Arduino_ST7735(bus, TFT_RST, ROTATION, false, 80, 160, 26, 1, 26, 1);

static const uint32_t screenWidth  = 160;
static const uint32_t screenHeight = 80;

void my_disp_flush(lv_display_t *display, const lv_area_t *area, uint8_t *px_map) {
  uint32_t w = lv_area_get_width(area);
  uint32_t h = lv_area_get_height(area);
  uint32_t stride = lv_draw_buf_width_to_stride(w, LV_COLOR_FORMAT_RGB565);
  uint8_t * row_ptr = px_map;

  for (uint32_t y = 0; y < h; y++) {
    gfx->draw16bitRGBBitmap(area->x1, area->y1 + y, (uint16_t *)row_ptr, w, 1);
    row_ptr += stride;
  }
  lv_display_flush_ready(display);
}

// ==========================================
// Animation callbacks (receive value changes from the LVGL animation engine)
// ==========================================

// Callback: update object X position (horizontal movement)
static void anim_x_cb(void * var, int32_t v) {
  lv_obj_set_x((lv_obj_t *)var, v);
}

// Callback: update object Y position (vertical movement)
static void anim_y_cb(void * var, int32_t v) {
  lv_obj_set_y((lv_obj_t *)var, v);
}

void setup() {
  Serial.begin(115200);
  pinMode(TFT_BLK, OUTPUT);
  digitalWrite(TFT_BLK, HIGH);

  gfx->begin();
  gfx->fillScreen(BLACK);

  lv_init();
  lv_display_t *display = lv_display_create(screenWidth, screenHeight);
  lv_display_set_color_format(display, LV_COLOR_FORMAT_RGB565);

  static lv_color_t buf[screenWidth * screenHeight / 10];
  lv_display_set_buffers(display, buf, NULL, sizeof(buf), LV_DISPLAY_RENDER_MODE_PARTIAL);
  lv_display_set_flush_cb(display, my_disp_flush);

  // Set screen background to white
  lv_obj_set_style_bg_color(lv_scr_act(), lv_color_hex(0xFFFFFF), 0);

  // ==========================================
  // UI layout: transparent container wrapping child elements
  // ==========================================

  // 1. Create a transparent container (100x60)
  lv_obj_t * cont = lv_obj_create(lv_scr_act());
  lv_obj_set_size(cont, 100, 60);
  lv_obj_set_style_bg_opa(cont, 0, 0);             // Fully transparent background
  lv_obj_set_style_border_width(cont, 0, 0);       // No border
  lv_obj_set_style_pad_all(cont, 0, 0);            // No padding
  lv_obj_align(cont, LV_ALIGN_CENTER, 0, 0);       // Center the container

  // 2. Place the green square inside the container, aligned to top-center
  lv_obj_t *rect = lv_obj_create(cont);
  lv_obj_set_size(rect, 30, 30);
  lv_obj_set_style_bg_color(rect, lv_color_hex(0x00FF00), 0);
  lv_obj_set_style_border_width(rect, 0, 0);
  lv_obj_align(rect, LV_ALIGN_TOP_MID, 0, 0);

  // 3. Place the label inside the container, aligned to bottom-center
  lv_obj_t * label = lv_label_create(cont);
  lv_label_set_text(label, "hello world!");
  lv_obj_set_style_text_color(label, lv_color_hex(0x000000), 0);
  lv_obj_align(label, LV_ALIGN_BOTTOM_MID, 0, 0);


  // ==========================================
  // Dual animation effect (LVGL v9 animation engine)
  // ==========================================

  // Animation A: sweep the entire container (square + label) left and right
  lv_anim_t a_x;
  lv_anim_init(&a_x);
  lv_anim_set_var(&a_x, cont);                       // Bind to the container
  lv_anim_set_values(&a_x, -30, 30);                 // Move 30px left of center, then 30px right
  lv_anim_set_time(&a_x, 2000);                      // 2 seconds per pass
  lv_anim_set_playback_time(&a_x, 2000);             // 2 seconds on the return pass
  lv_anim_set_repeat_count(&a_x, LV_ANIM_REPEAT_INFINITE); // Loop forever
  lv_anim_set_path_cb(&a_x, lv_anim_path_ease_in_out);     // Ease-in-out for a natural feel
  lv_anim_set_exec_cb(&a_x, anim_x_cb);              // Bind the X-axis callback
  lv_anim_start(&a_x);                               // Start!

  // Animation B: make the green square bob up and down independently
  lv_anim_t a_y;
  lv_anim_init(&a_y);
  lv_anim_set_var(&a_y, rect);                       // Bind to the square only
  lv_anim_set_values(&a_y, 0, 10);                   // Shift 0 to 10 pixels downward
  lv_anim_set_time(&a_y, 300);                       // Fast bounce — 300ms per cycle
  lv_anim_set_playback_time(&a_y, 300);
  lv_anim_set_repeat_count(&a_y, LV_ANIM_REPEAT_INFINITE);
  lv_anim_set_path_cb(&a_y, lv_anim_path_ease_in_out);
  lv_anim_set_exec_cb(&a_y, anim_y_cb);              // Bind the Y-axis callback
  lv_anim_start(&a_y);                               // Start!
}

// Track the last timestamp
uint32_t last_tick = 0;
void loop() {
  // 1. Calculate how many milliseconds have passed since the last loop
  uint32_t current_tick = millis();
  uint32_t elapsed_time = current_tick - last_tick;
  last_tick = current_tick;

  // 2. Feed elapsed time to LVGL — this is what makes animations move
  lv_tick_inc(elapsed_time);

  // 3. Let LVGL process animations and redraw the UI
  lv_timer_handler();

  // 4. Small delay to avoid pegging the CPU
  delay(5);
}
Key Code Explained
These are the spots where beginners most often get tripped up — read through them against your own code.
1. Offset parameters in GFX initialization
Arduino_GFX *gfx = new Arduino_ST7735(bus, TFT_RST, ROTATION, false, 80, 160, 26, 1, 26, 1);The last four numbers — 26, 1, 26, 1 — are col_offset1, row_offset1, col_offset2, row_offset2. If your display content is shifted to one corner or has black bars around it, these are the values to tweak. Different ST7735S modules from different manufacturers use different offsets; the values here are the most common.
2. Screen dimensions — landscape orientation
#define ROTATION 1  // Landscape rotation
static const uint32_t screenWidth  = 160;  // Width after rotation
static const uint32_t screenHeight = 80;   // Height after rotation
The physical display is 80×160 (portrait). With ROTATION=1 it rotates 90° to 160×80. The LVGL display dimensions must match the rotated orientation — otherwise the content will be scrambled.
3. The flush callback — bridge between LVGL and GFX
void my_disp_flush(lv_display_t *display, const lv_area_t *area, uint8_t *px_map) {
  ...
  lv_display_flush_ready(display);  // Don't forget this line!
}
lv_display_flush_ready() signals to LVGL that this region has been drawn and it can move on to the next. Omit it and the screen will never update.
4. Feeding time in the loop
lv_tick_inc(elapsed_time);
lv_timer_handler();
These two lines are the heartbeat of LVGL animations. lv_tick_inc feeds elapsed time; lv_timer_handler triggers redraws. Leave out either one and nothing will animate.
Troubleshooting
| Symptom | Likely Cause | Fix |
|---|---|---|
| White screen (backlight on, no content) | Flush callback not registered, or lv_display_flush_ready() missing | Verify my_disp_flush is set as the flush_cb |
| Garbled / random colored blocks | SPI pins wired wrong or loose connection | Recheck wiring, make sure Dupont wires are seated firmly |
| Shifted image / black border | ST7735S offset params don’t match your module | Adjust col_offset and row_offset in the Arduino_ST7735 constructor |
| Wrong colors (blue shows as red) | RGB/BGR order incorrect | Check the color order parameter in GFX initialization |
| Image upside down | Wrong rotation value | Try setting ROTATION to 0 or 3 |
| Compile error: lvgl.h not found | LVGL not installed or wrong version | Make sure you have LVGL v9.x installed (not v8) |
| Animation frozen, static UI | lv_tick_inc() or lv_timer_handler() missing from loop | Confirm both lines are present in loop() |