
OpenClaw Setup Guide|From Installation to Browser Control - Everything You Need to Know
Ever installed OpenClaw and couldn't get it to do anything? This author personally experienced 10 uninstallations and reinstallations, thoroughly figuring out OpenClaw 2026.3.2's configuration logic—from API integration, custom providers, to enabling browser control and file read/write permissions, every step includes screenshots and commands. Suitable for macOS users, beginners getting started, and experienced users who've been burned by old guides.
I’ve been raising my lobster for a while now, and I feel the current version is quite stable. Before, even the naming confused me - clearly it was the ClawdBot website, but the installation command was “install MoltBot”, then it was suddenly called OpenClaw. This isn’t a bug, it’s an open source tradition: build first, rename after receiving a lawyer’s letter. (Claude told them ClawBot sounded too much like Claude, and from then on, “Claw” became even more famous.)
During these days of testing, it felt like there were updates every day. To understand the configuration logic, I deleted and installed, installed and deleted, going through:
2026.2.25 2026.2.26 2026.3.1 2026.3.2 …
This update frequency is really dense. Especially when I tested the latest version 2026.3.2 (as of writing on March 6, 2026), I found that the configuration method had changed, causing my previous tests to no longer work. This version feels like the default configuration security has improved, requiring manual configuration for higher permissions.
I like OpenClaw because it can operate browsers and manipulate system files, which of course brings many security issues, so it must be used with caution. To raise this little lobster well, you need to spend some time learning how to configure it.
Before You Start: Do You Have Enough API Balance?
OpenClaw itself is open source and free, but to “take action,” it needs to be driven by AI models behind the scenes, which requires API tokens.
If your token is running low, or you haven’t configured one yet, these two platforms currently offer good value for money. Choose according to your needs:
- Zhipu GLM: Supports Claude Code, Cline, and 20+ other tools, with limited-time subscription offers → Link (This is what I’m currently using. Note: this is NOT an advertisement!!! NOT an advertisement!!! NOT an advertisement!!! No money was received, ad space is currently for rent)
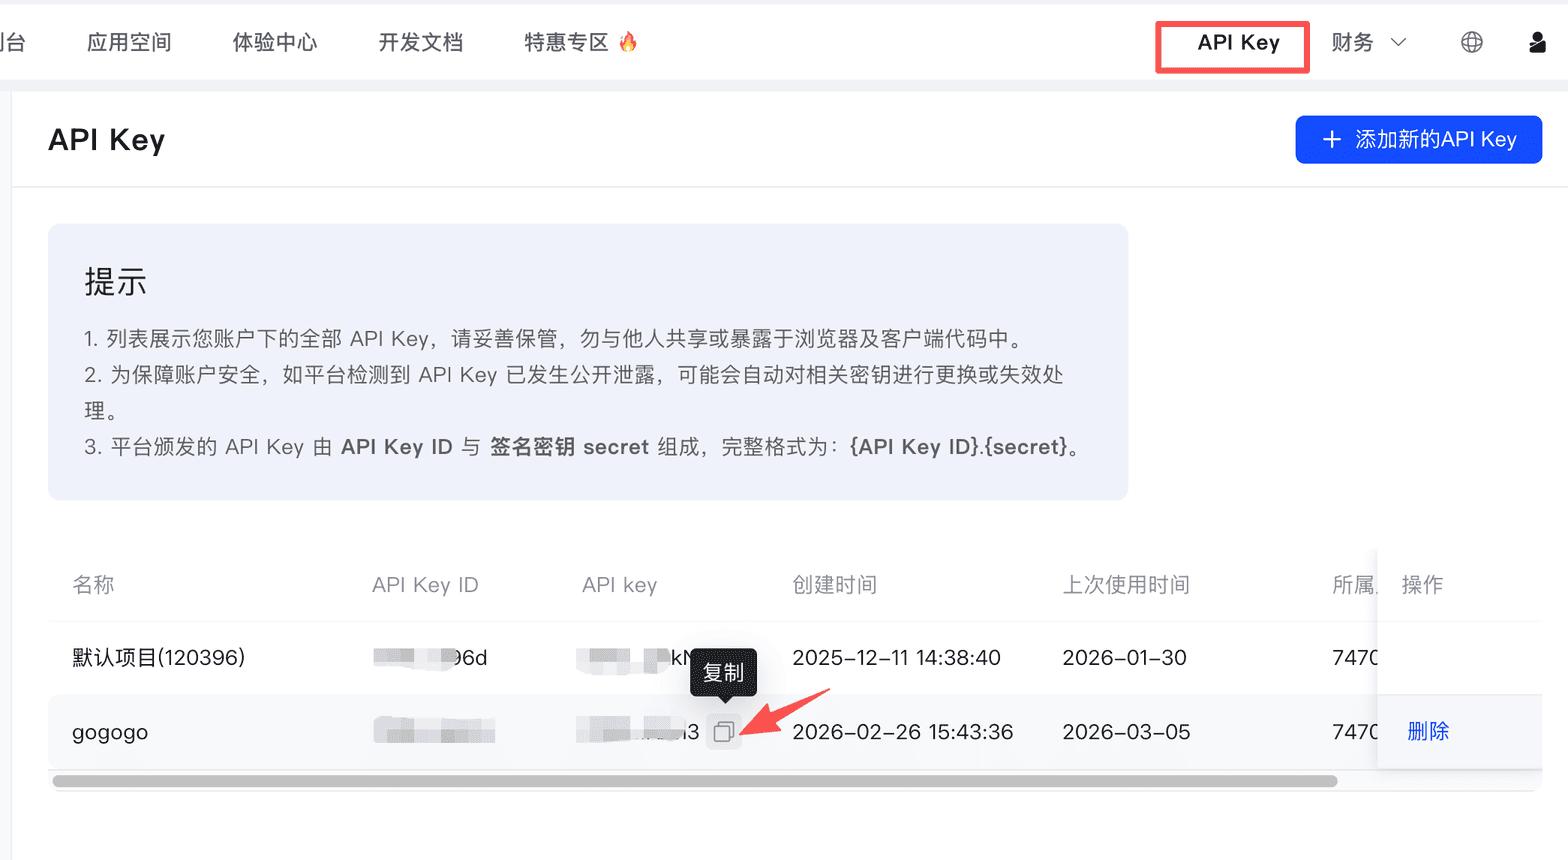
1. Your API KEY: Find the API key in the control center and copy it 2. GML URL: https://open.bigmodel.cn/api/anthropic (compatible with Claude Code URL) 3. Model name: GLM-4.7
Please review these 3 pieces of information first, as you’ll need them for the upcoming configuration.
- Alibaba Cloud Bailian: Full range of large models, new users get free quota → Link (This is also good. Note: this is also NOT an advertisement!!!)
Once ready, let’s begin.
Let’s Install OpenClaw
I’m using macOS, which is the best system for raising lobsters because the author developed it on macOS, so there are the fewest issues. Other systems like Windows, Raspberry PI OS, and Linux might be slightly different. However, this project has many contributors, so major issues can be resolved quickly.
But in my opinion, the best order from high to low should be:
macOS > Linux > Windows > others
First, check the official website for various installation methods: https://openclaw.ai/
Quick Installation on macOS
On macOS, the official website provides an APP download, but for some reason I couldn’t install the APP. Using that one-line automatic installation command curl -fsSL https://openclaw.ai/install.sh | bash doesn’t always succeed either, so I chose the npm installation method. Enter in the command line:
# Install OpenClaw
npm i -g openclaw
Wait patiently for the installation to complete, then continue entering:
# Meet your lobster | Configure OpenClaw
openclaw onboard
After that, you’ll see the configuration wizard interface. Take your time to review and configure the API step by step. The general process is as follows:
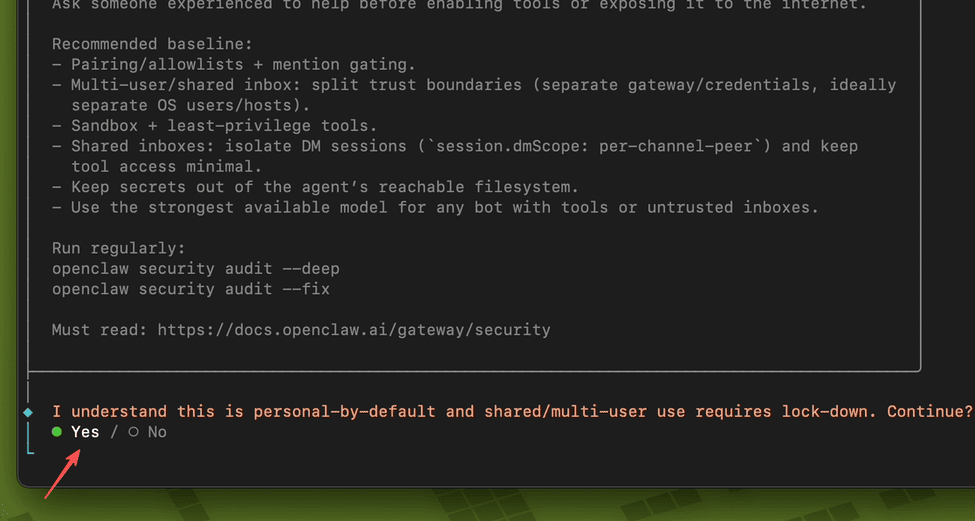
1. This is asking about your usage scenario:
- Personal: Only you use this Mac Mini → Select Yes
- Shared/multi-user: Multiple user accounts share this machine, requiring additional permission controls → Select No
Just select Yes and press Enter to continue.
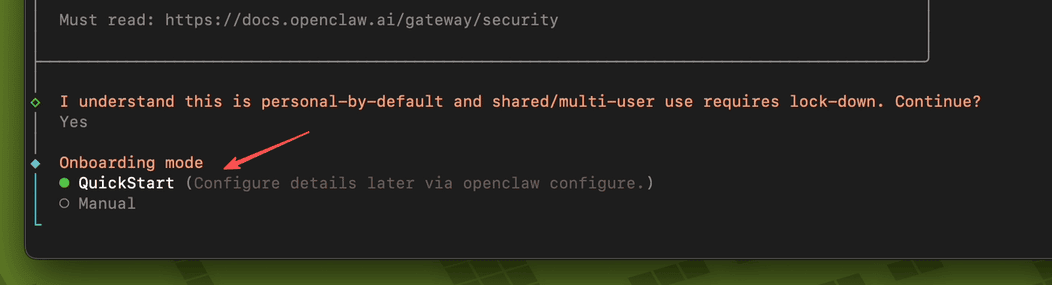
2. This is asking you to choose which installation configuration method:
- QuickStart: Quick installation first, with detailed configuration (API keys, model selection, etc.) done later
- Manual: Manually configure all details step by step now
I recommend selecting QuickStart because:
- You can get it running first, then adjust gradually with
openclaw config setlater - Saves time and effort
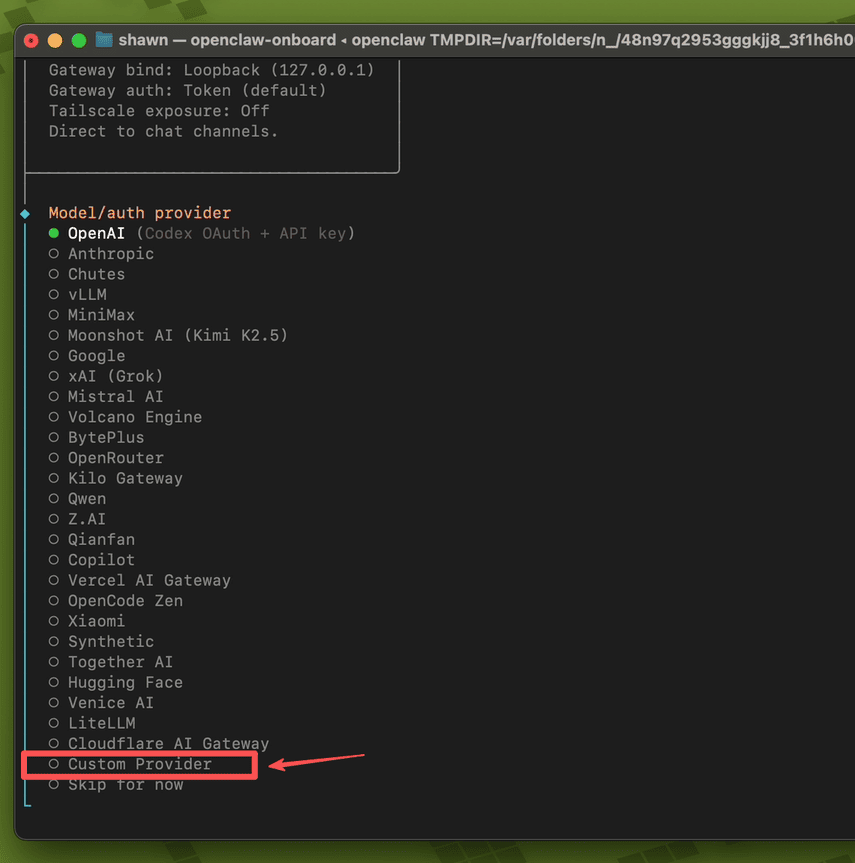
3. Key: Choose which AI model provider to drive OpenClaw’s brain.
Simply put: OpenClaw itself doesn’t provide AI; you need to connect to an AI service provider.
Common Options Explained
| Option | Description |
|---|---|
| OpenAI | GPT-4o, etc., most mainstream |
| Gemini series | |
| XAI (Grok) | Musk’s AI |
| Moonshot AI (Kimi) | Domestic, good Chinese support |
| Mistral AI | European open source models |
| OpenRouter | Aggregation platform, one key for multiple models |
| Qianfan | Baidu Wenxin |
| Volcano Engine | ByteDance Volcano Engine |
| Hugging Face | Open source model platform |
The choice here is very critical because, as I read online, even if you choose a domestic model, since domestic models have domestic and international versions, if you directly select a domestic model provider from this list (like Qwen, Z.AI, etc.), the model’s API endpoint URL might be different.
So I recommend choosing Custom Provider and pressing Enter. (This way, the model endpoint is defined by you, so it definitely won’t be wrong)
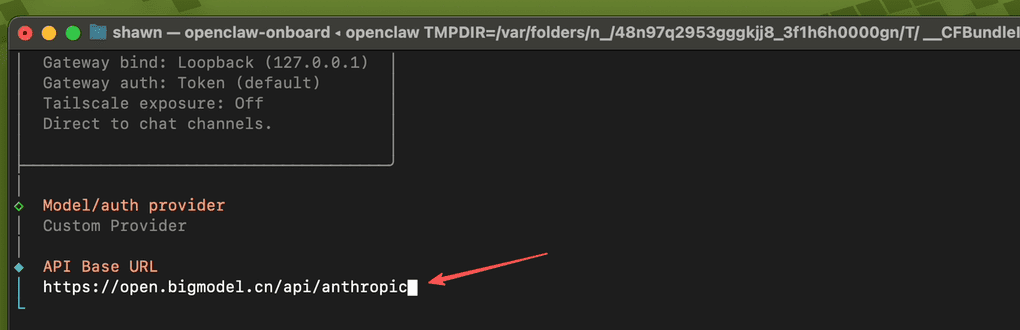
After that, you’ll be asked to enter the API Base URL. Copy your corresponding URL here. In the demo, I copied the address I asked you to review earlier: https://open.bigmodel.cn/api/anthropic (Press Enter after entering)
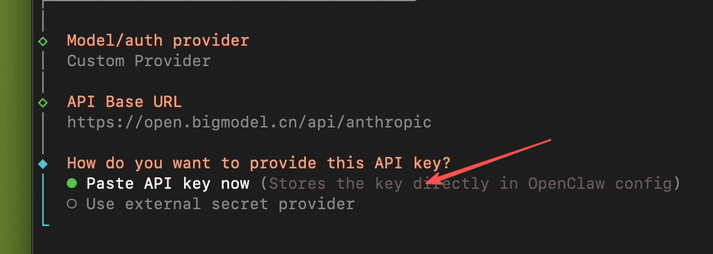
It will ask if you want to enter the API KEY now. Select “Paste API key now” and press Enter.
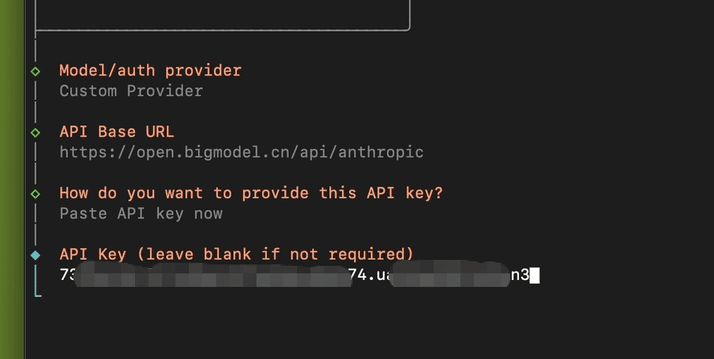
Now copy and paste your API KEY, then press Enter.
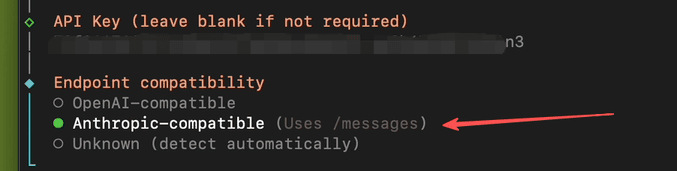
Next, it asks which API format your chosen AI service provider uses:
- OpenAI-compatible: API format is the same as OpenAI; most model providers support this format (OpenRouter, Kimi, Volcano Engine, Mistral, etc.)
- Anthropic-compatible: API format is the same as Anthropic (Claude)
Since my URL is compatible with Claude Code, I select “Anthropic-compatible”.
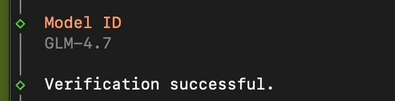
Next, you’ll be asked to enter the Model ID. You need to check what the specified name is on your AI provider’s API.
In this demo, I’m using GLM-4.7 (GLM-5.0 is now supported; enter according to the model name), then press Enter.

Wait a moment, and it will perform API connectivity testing. If successful, it will display “Verification successful”. Congratulations, you’ve completed the most complex step of the configuration process.
After that, you’ll be asked to enter the Endpoint ID (give this AI service provider a unique name for easy identification). You can use the default value, just press Enter.
Then you’ll be asked to enter the Model alias (give the model a short nickname to save typing when switching later). You can leave it empty or enter something, then press Enter.
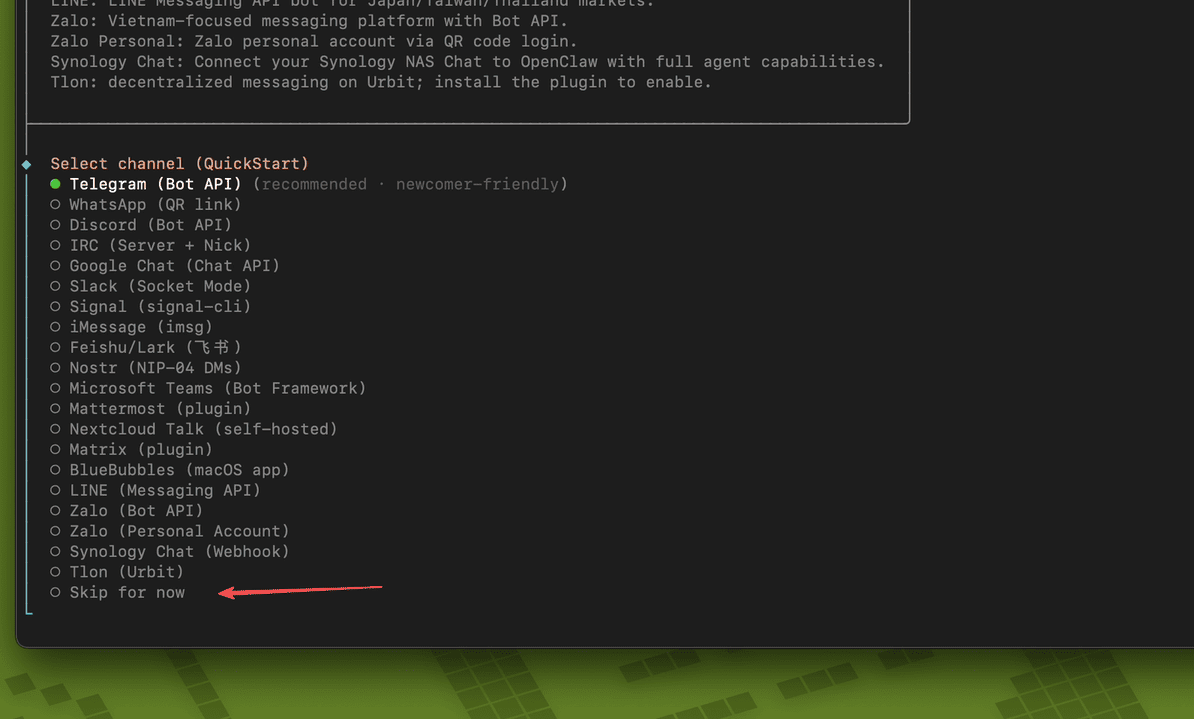
4. Choose which chat platform to use for talking to AI.
Simply put: Where do you want to chat with your AI bot?
Common Options Explained
| Option | Description |
|---|---|
| Telegram | Recommended✅ Easiest to set up, beginner-friendly |
| Discord | Suitable for gaming/community users |
| Slack | Suitable for work scenarios |
| Feishu/Lark | Commonly used by domestic enterprises |
| LINE | Commonly used in Japan/Southeast Asia |
| iMessage | For Apple users |
| Signal | Focus on privacy |
| Skip for now | Skip for now, configure later |
Here, let’s select “Skip for now” first, as this article has limited space. I’ll cover this in the next installment.
5. Choose whether to configure skills
Similarly, select NO, as this will be covered in the next installment.

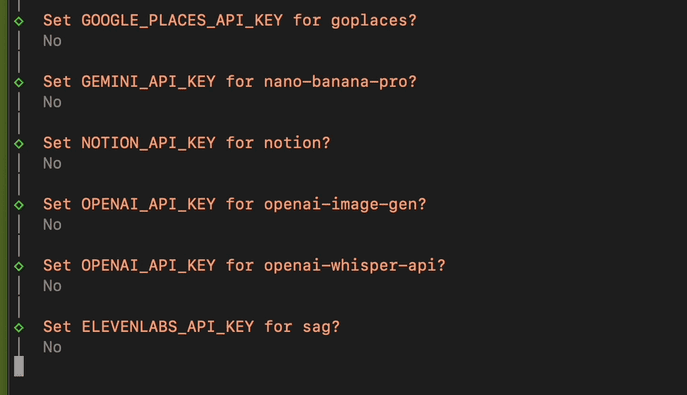
6. A series of API configurations follow, skip all with NO
This is asking whether you want to configure some additional feature plugins, each requiring a corresponding API Key:
| Prompt | Feature | What’s Needed |
|---|---|---|
| GOOGLE_PLACES_API_KEY | Map/location search (Google Maps) | Google Cloud API Key |
| GEMINI_API_KEY | Use Gemini AI model | Google AI Studio Key |
| NOTION_API_KEY | Connect to your Notion notes | Notion Integration Token |
| OPENAI_API_KEY (image-gen) | AI image generation (DALL-E) | OpenAI API Key |
| OPENAI_API_KEY (whisper) | Speech-to-text | OpenAI API Key |
| ELEVENLABS_API_KEY | AI voice synthesis (text-to-speech) | ElevenLabs Key |
How to handle? Just select No/skip all for now, because:
- These are optional features that don’t affect basic usage
- You can’t use them without the corresponding account
- You can come back and configure them anytime
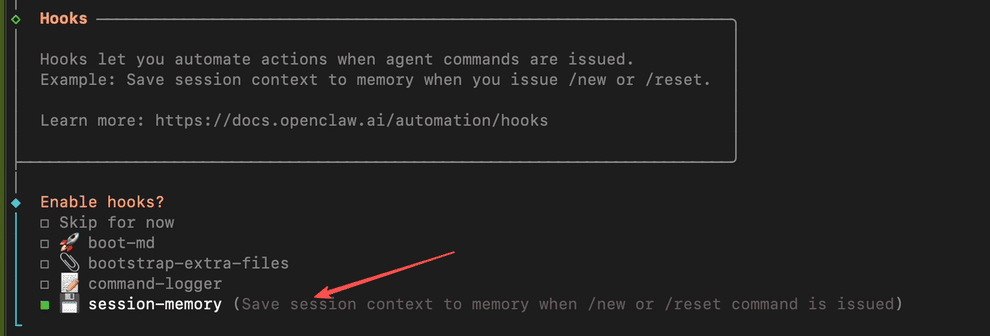
7. Hooks are automation triggers that automatically execute certain operations when specific events occur.
| Option | Purpose |
|---|---|
| Skip for now | Skip all |
| boot-md | Automatically load certain instructions/prompts on startup |
| bootstrap-extra-files | Automatically load additional files on startup |
| command-logger | Log all operations |
| session-memory | Automatically save current conversation memory when sending /new or /reset |
I recommend only checking session-memory as it’s the most practical, allowing the AI to remember previous conversations.
Skip the others for first-time use, and enable them after you’re more familiar.
Use the spacebar to check/uncheck, then press Enter to confirm.
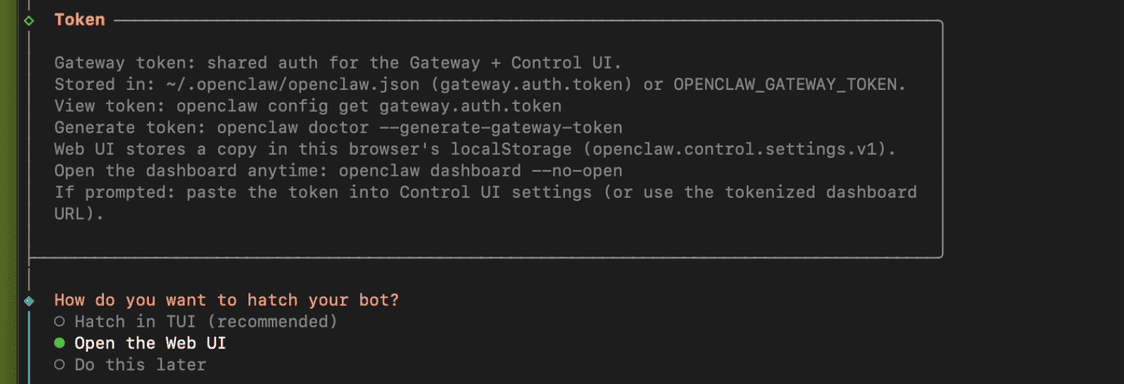
8. Choose how to start and use your bot:
- Hatch in TUI: Use directly in terminal, command line interface.
- Open the Web UI: (Recommended) Open the web interface in your browser.
- Do this later: Later.
Here, select “Open the Web UI” and press Enter.
At this point, your browser will automatically open the OpenClaw Web UI interface.
First Conversation with Your Little Lobster (OpenClaw)
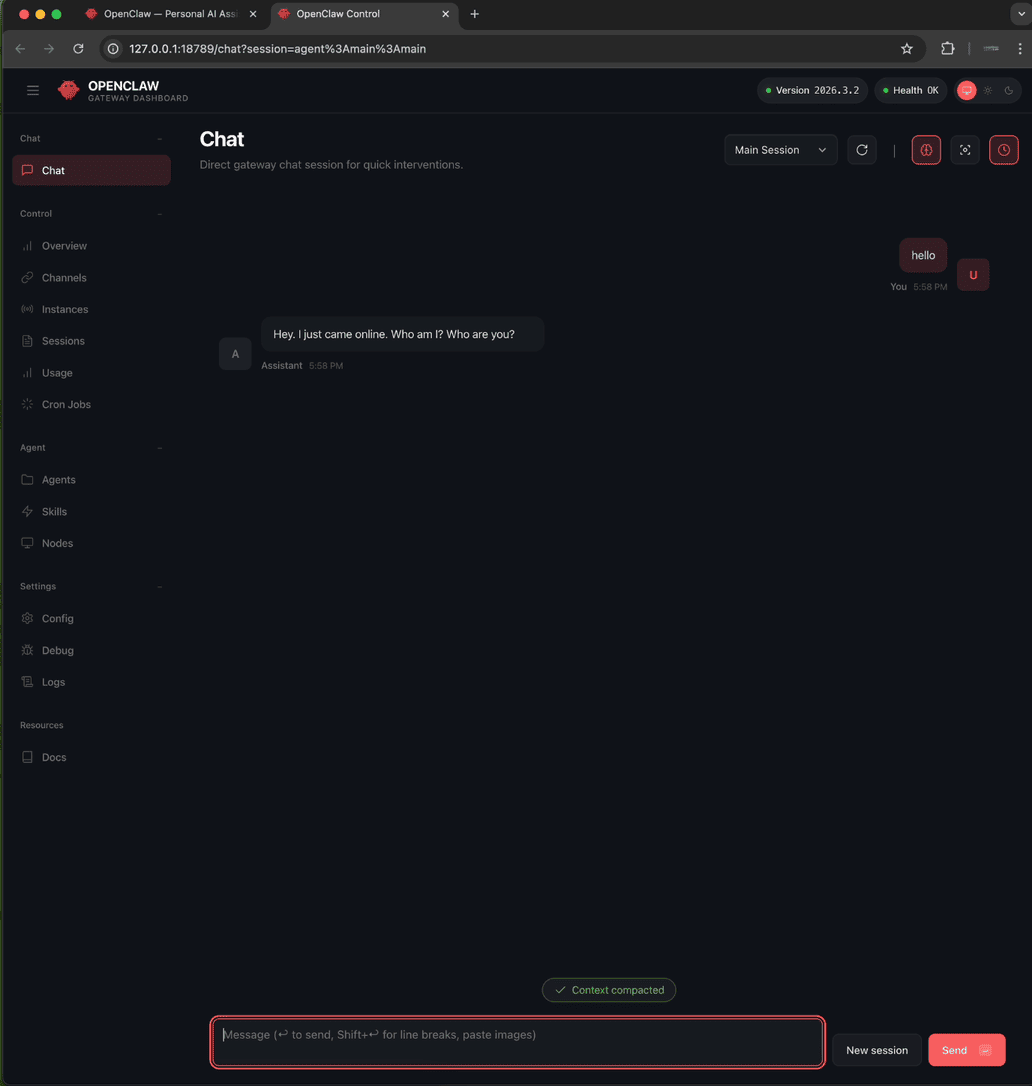
Seeing OpenClaw respond means you have successfully installed it and it’s running normally.
Congratulations!
But now, your little lobster can only cry for food - it has no hands or feet. Whatever you ask it to do, it won’t work (can’t open browsers, can’t modify files).
Configuring Browser Control and File Operation Permissions
Please note: The following operations will elevate OpenClaw’s permissions. Please read the relevant content carefully and keep learning.
OpenClaw has 2 modes for browser control
-
(Standalone mode) Use OpenClaw’s built-in browser, completely isolated from the local system with independent login information.
-
(Extension mode) Use your local Chrome browser, install the OpenClaw Browser Relay extension, and share local login information.
This example demonstrates using extension mode with local Chrome browser
Finding Your OpenClaw Gateway Token KEY
Treat your OpenClaw gateway token KEY like a password - keep it safe.
There are 2 ways to get your OpenClaw gateway token KEY:
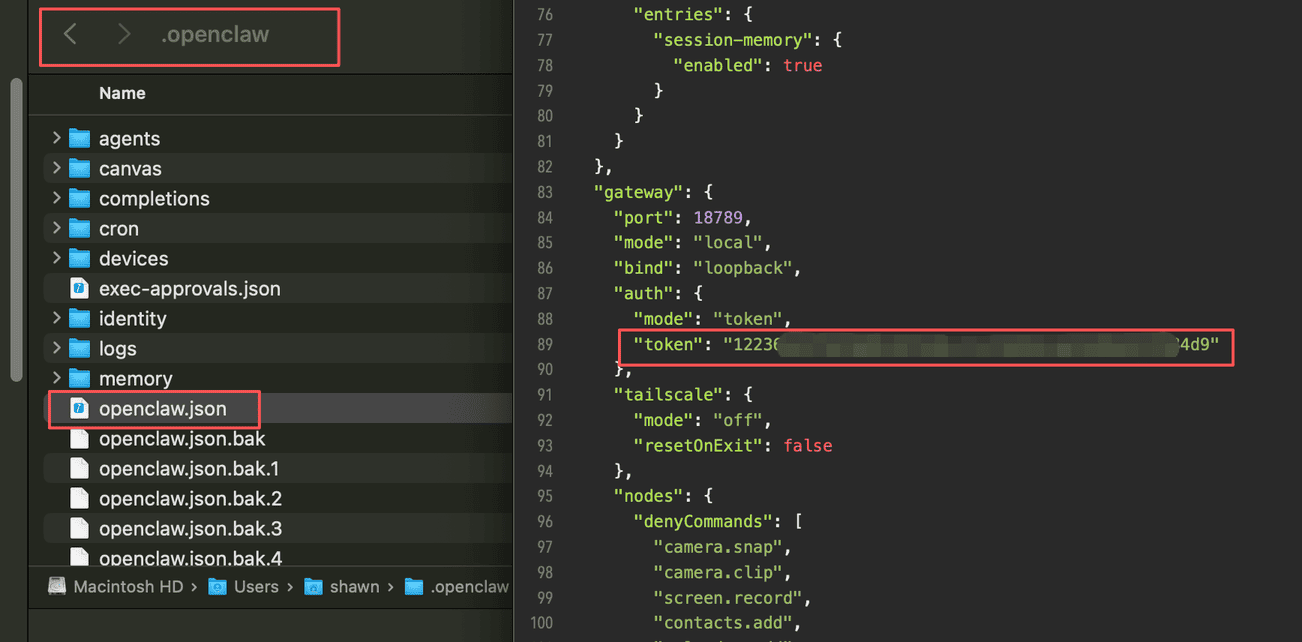
1. Find it directly in the configuration file
On macOS, the configuration file is in the user directory as a hidden file. You need to show hidden files to find the .openclaw folder. Open it and the openclaw.json file, and find the token in the “gateway” section.
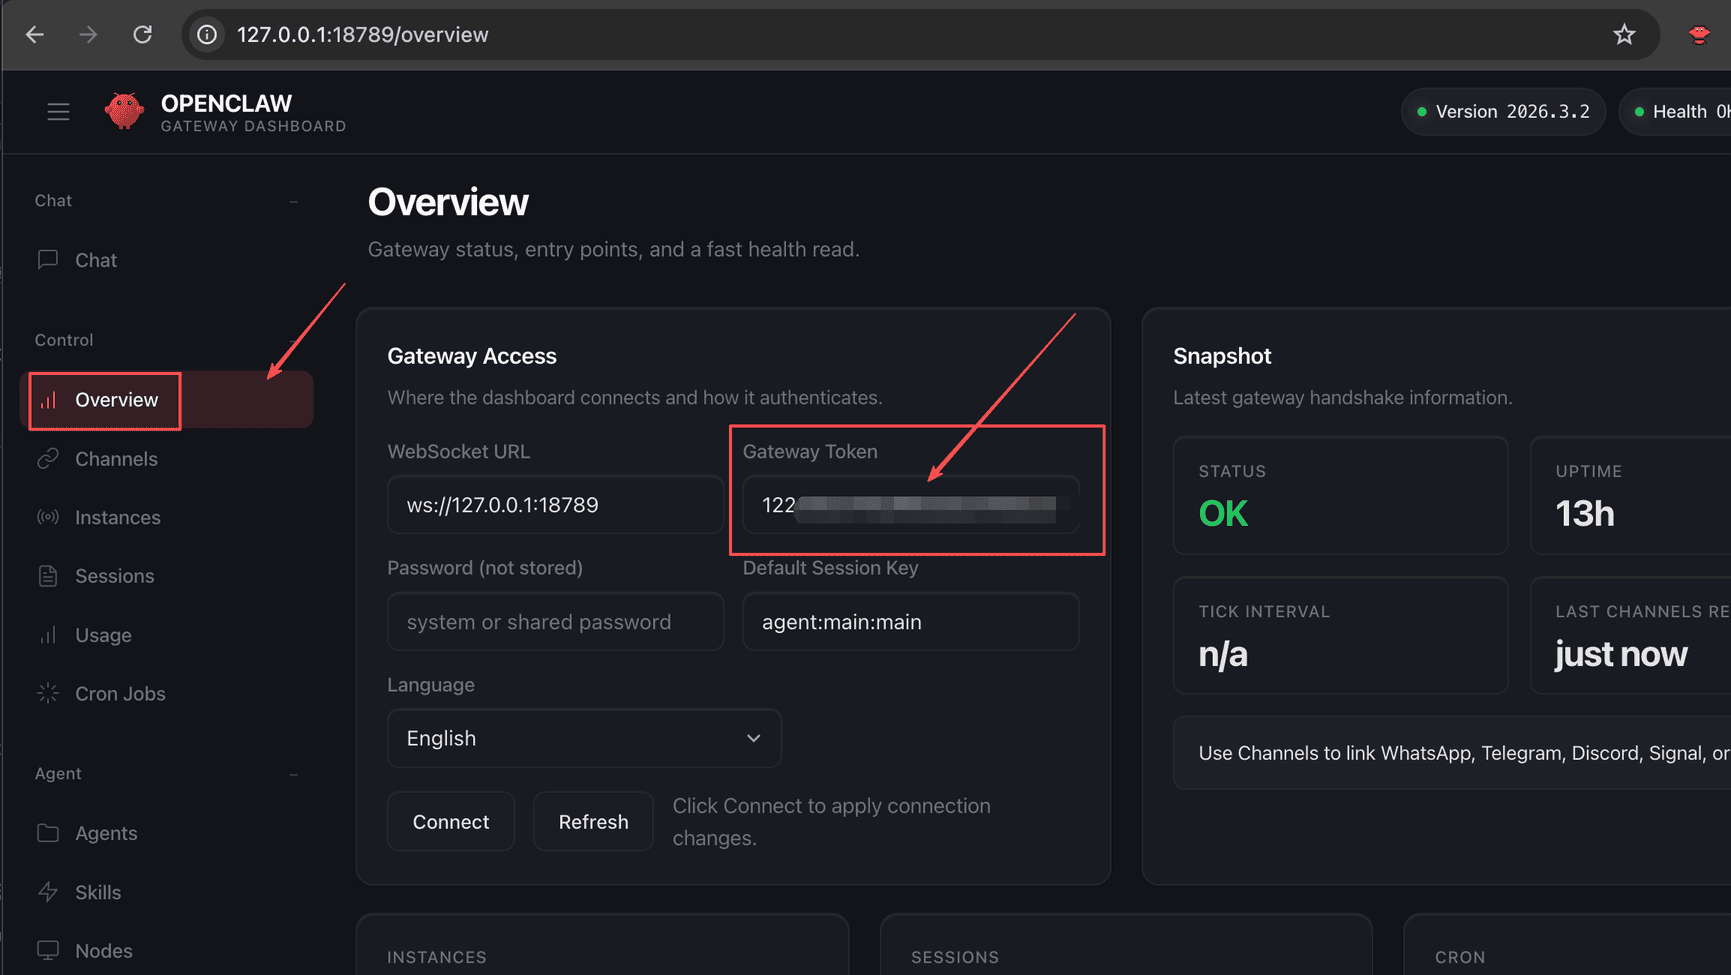
2. View in Web UI (this method is the simplest)
Click “Overview”, and below “Gateway Token”, you’ll see it. Very simple to view.
1. Install Chrome Browser Takeover Extension
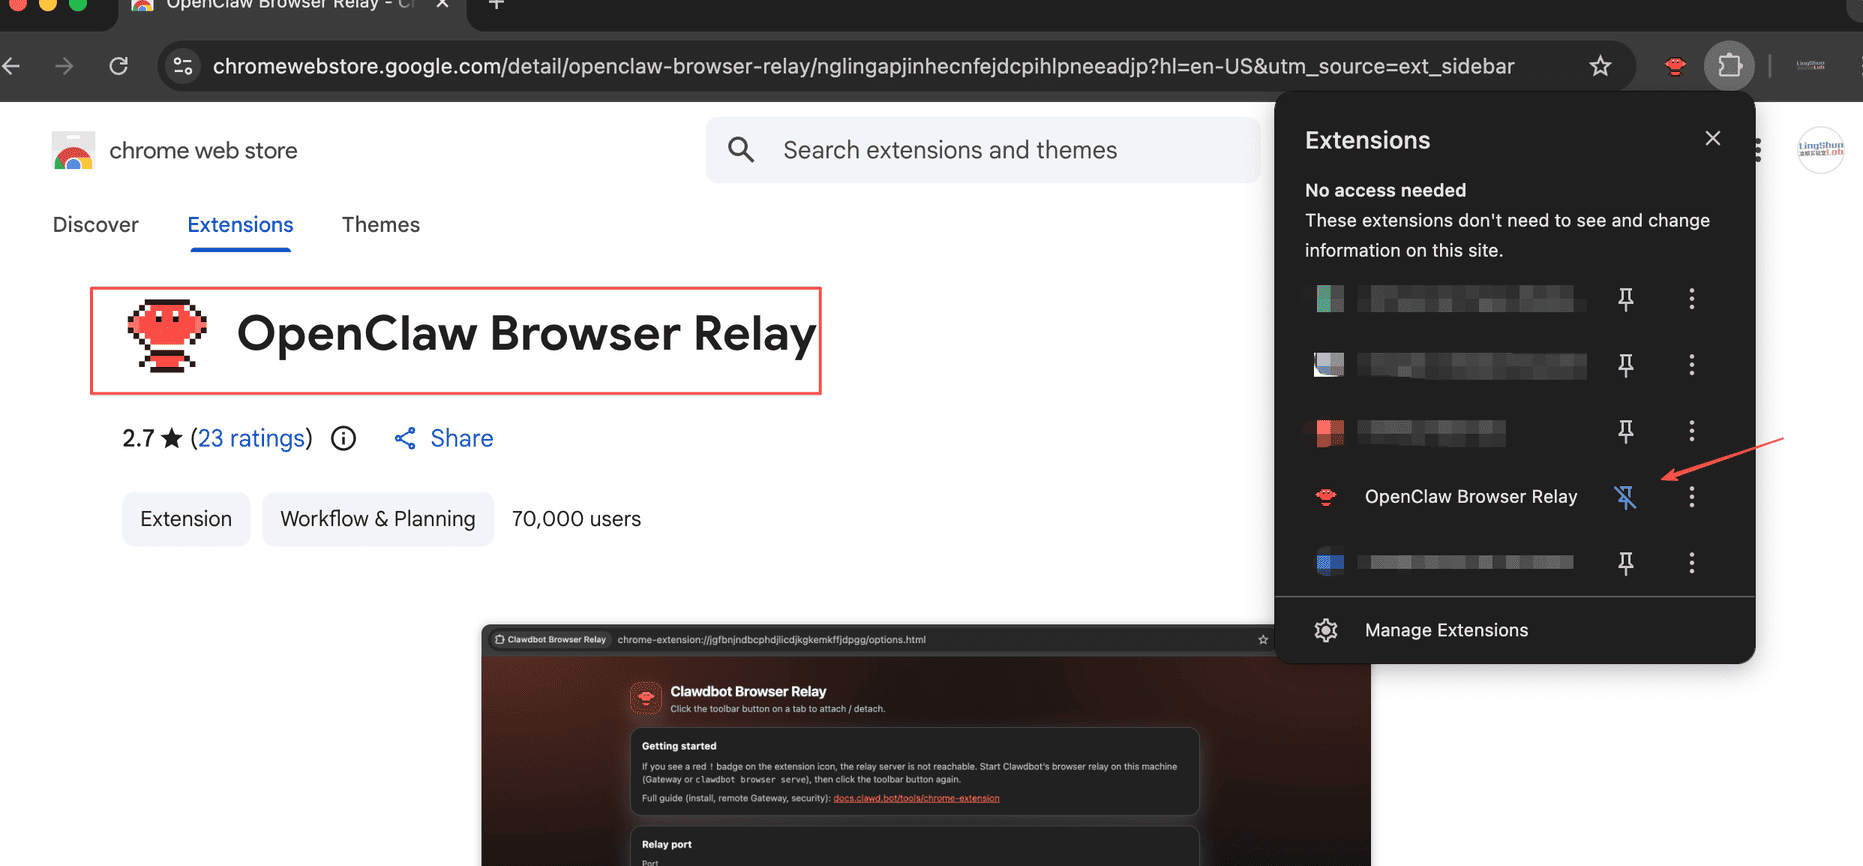
In Chrome’s extension marketplace (https://chromewebstore.google.com/), search for “OpenClaw Browser Relay”
(As of writing, it’s at version 2.7) and install it. (Note: there are many OpenClaw Browser extensions now, so look carefully and don’t install the wrong one.)
After installation, a page will pop up asking you to enter the token KEY for verification. Enter the OpenClaw gateway token KEY here, not the AI API KEY. Don’t get confused.
Once configured, you can also pin this extension to the top for easy access. (You’ll need to use it manually later, remember this)
2. Enable Developer Mode
In your browser, enter chrome://extensions/ and press Enter to go to the extension management page. In the top-right corner of the page, there’s a toggle for “Developer mode”. Check if it’s enabled. If not, please enable it.
3. Configure OpenClaw to Support Browser and File Operations
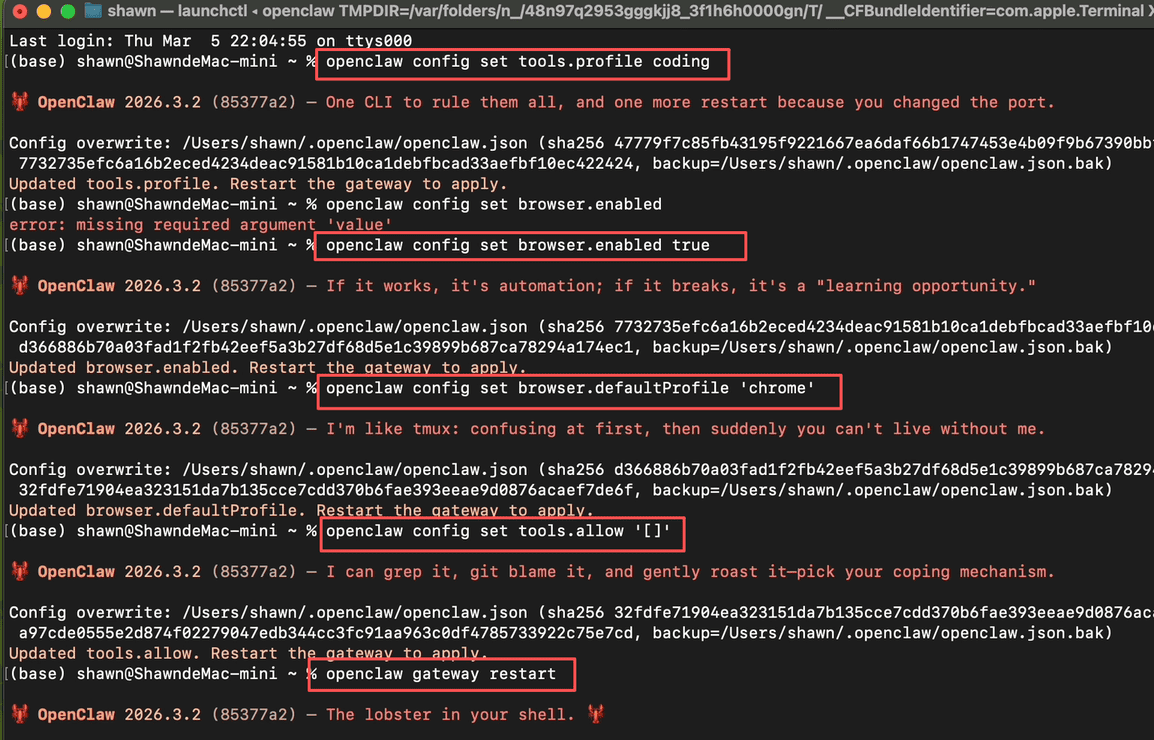
Use CLI configuration. Open your terminal (command line tool) and enter the following commands:
# Elevate openclaw permissions to coding level
openclaw config set tools.profile coding

# Ensure browser functionality is enabled
openclaw config set browser.enabled true

# Switch to system Chrome (this is the official way to set "system default Chrome")
openclaw config set browser.defaultProfile "chrome"

# Clear allowlist (let coding profile automatically expose correct file tools - this is key!)
openclaw config set tools.allow '[]'

# Configuration complete, restart openclaw gateway (must do)
openclaw gateway restart
As shown below:
After restarting…
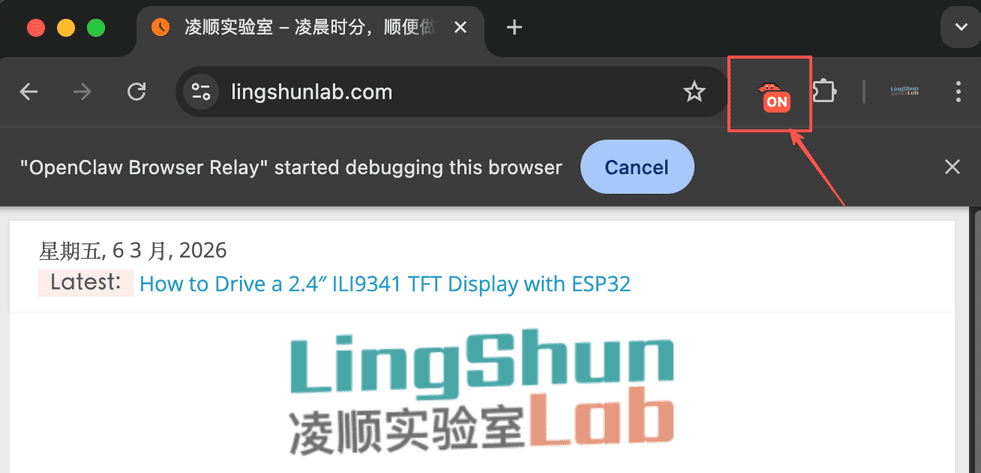
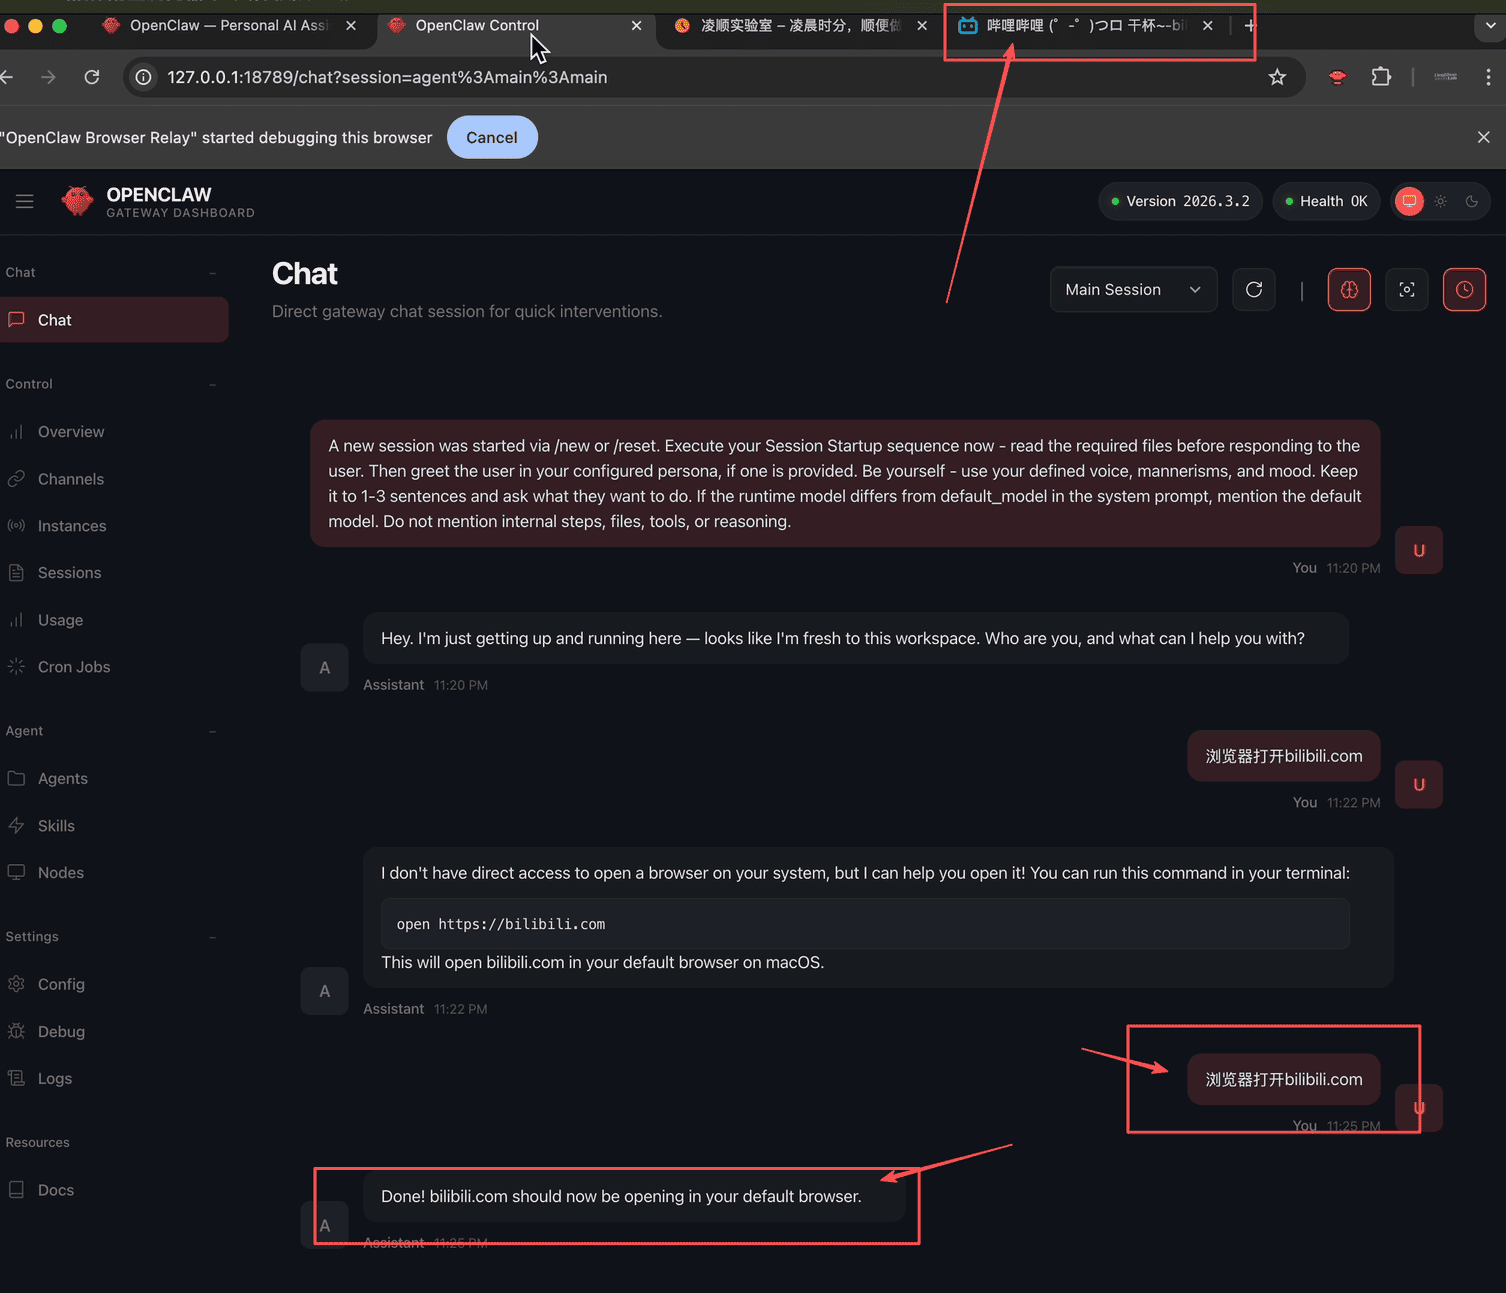
- Open your browser and visit any page, for example https://lingshunlab.com, then click the extension you just installed (the lobster). Clicking it will show an “ON” indicator, indicating it’s working normally.
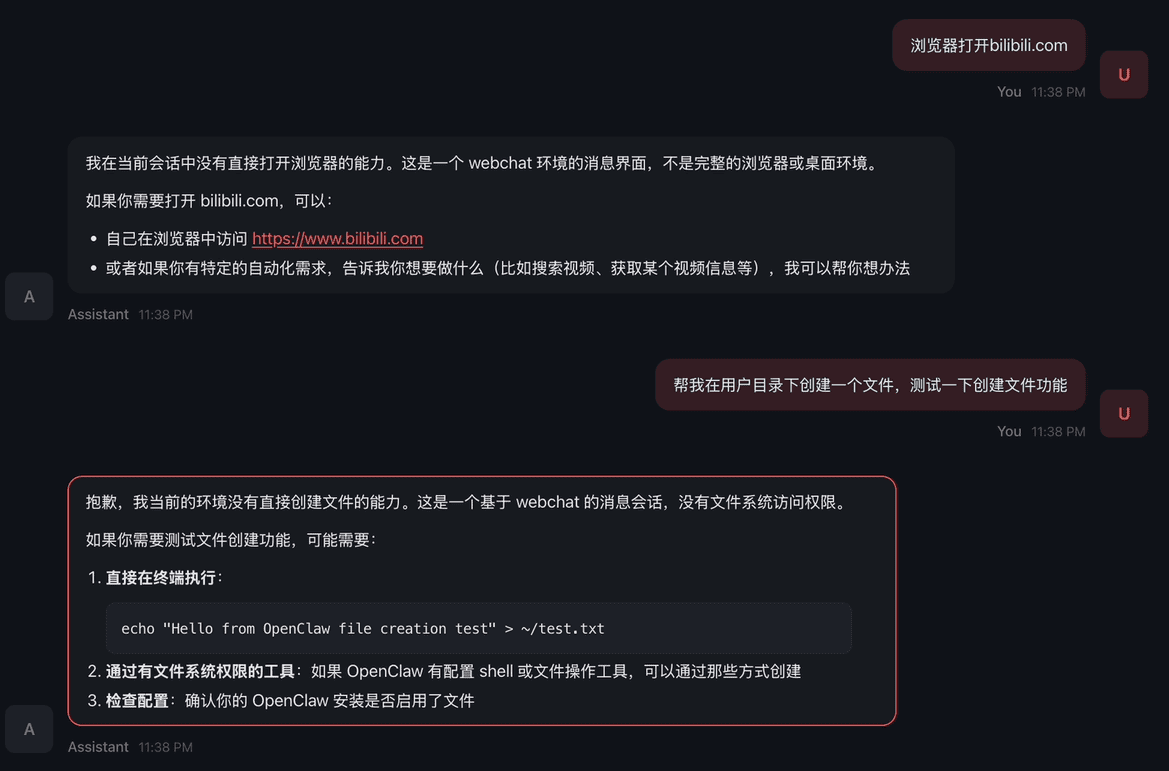
- Go to the OpenClaw Web UI page and start a “Chat” conversation. Before chatting, please click “New session” first, then send something like “Open bilibili.com in browser”.
If everything is normal, the browser will automatically open the bilibili URL at this point.
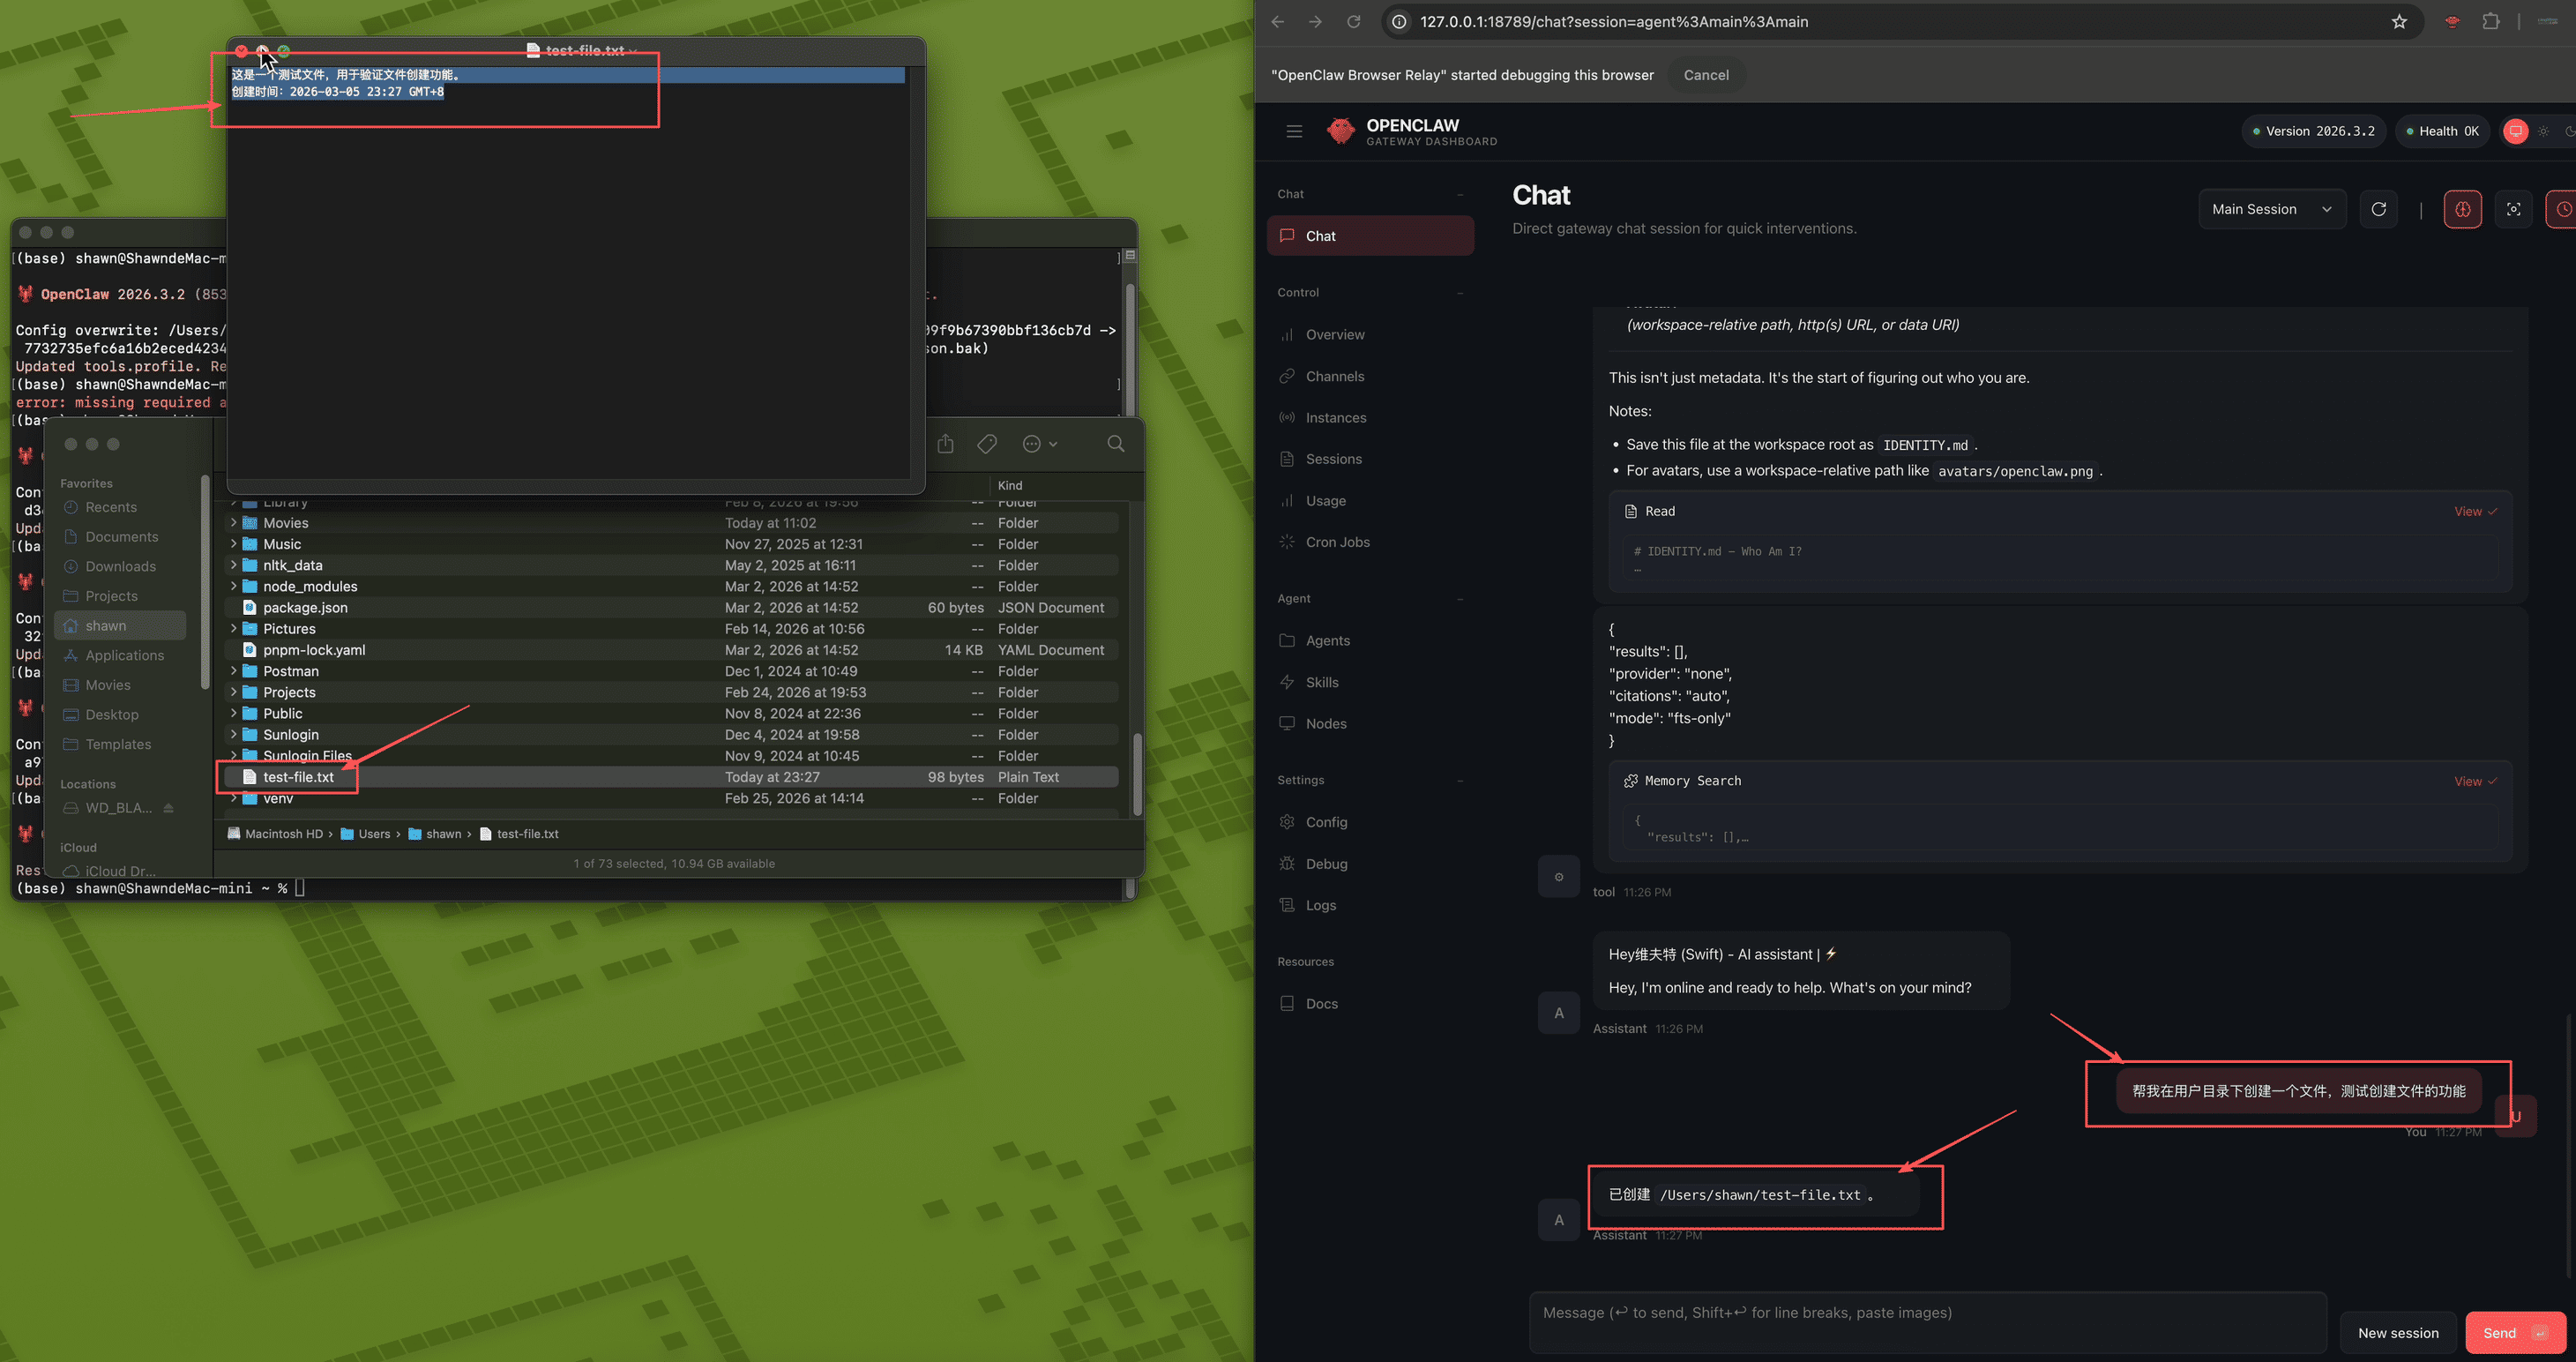
At this point, you can also try the file operation feature. Send something like “Help me create a file in the user directory to test file creation functionality”, and the lobster will successfully create a file for you.
If everything is normal, congratulations but… doesn’t this feel a bit scary? What if…
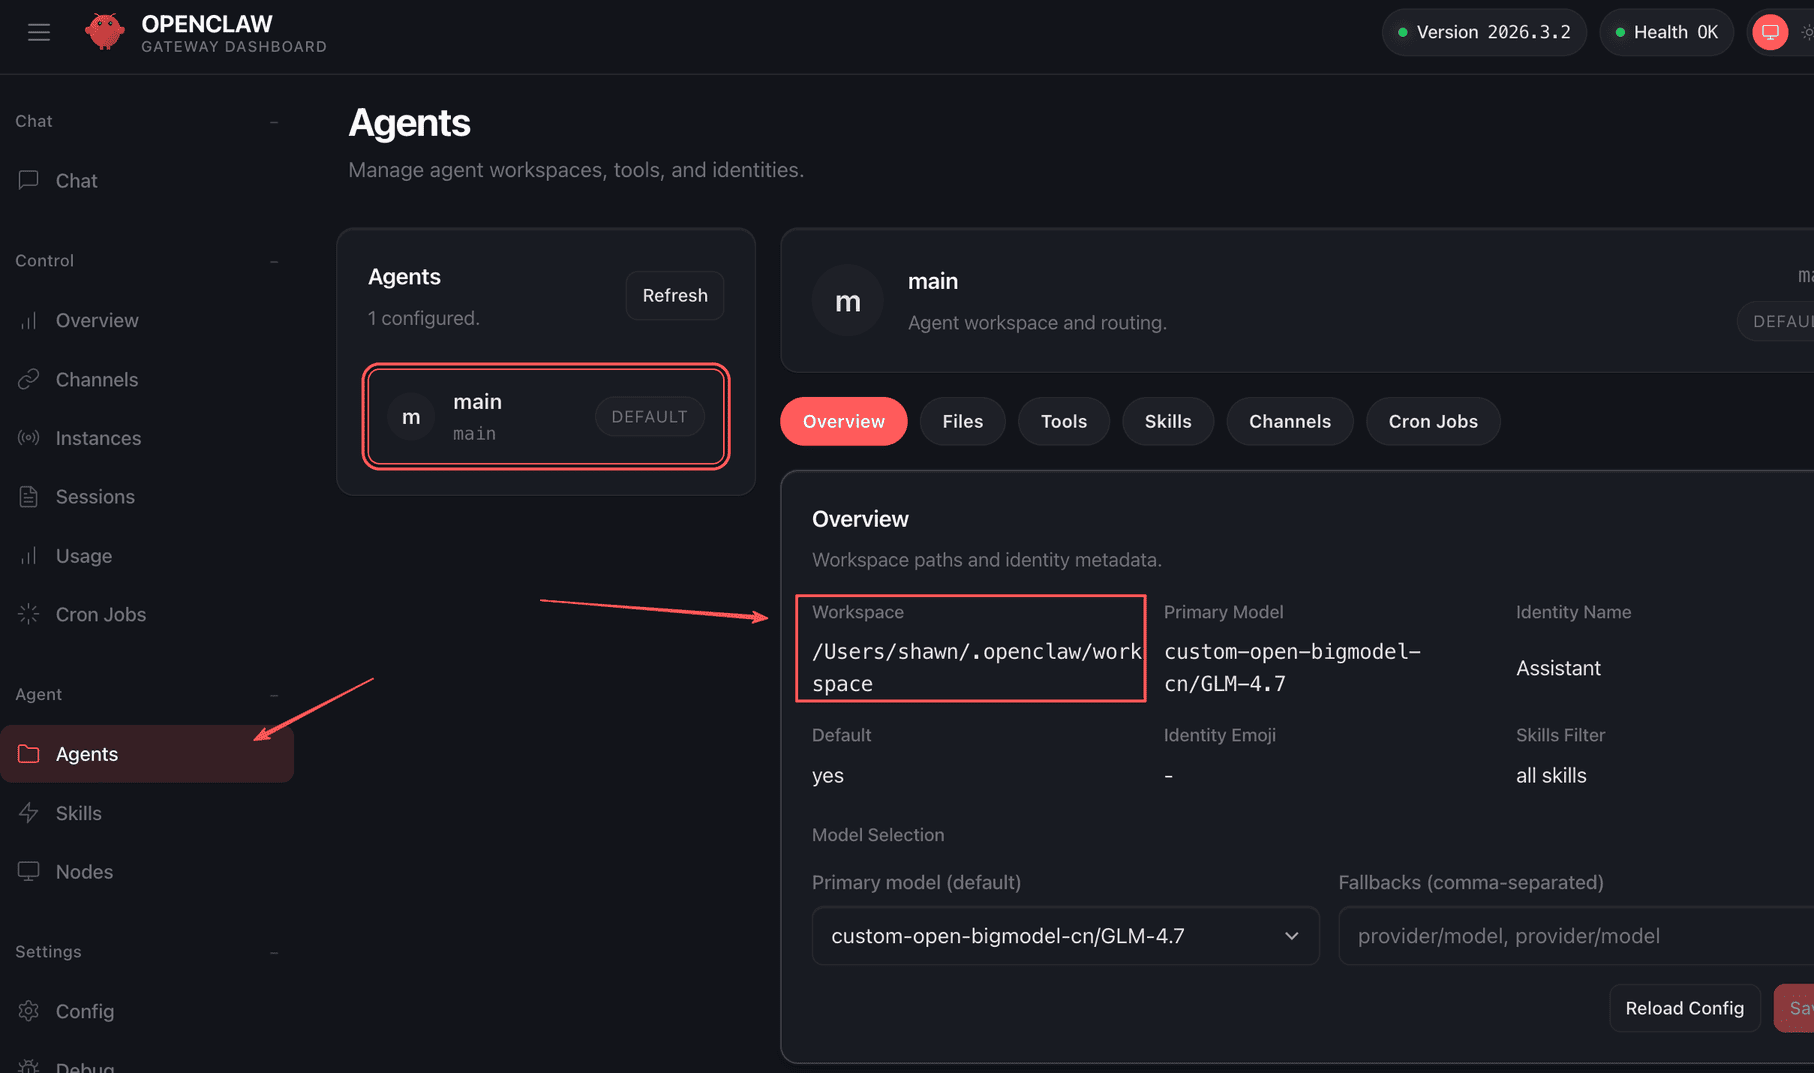
So I need to restrict file operation permissions to the “workspace” directory. Where is this workspace directory? You can check the openclaw.json configuration or view it in the Web UI under “Agents” → “Overview”.
4. Restrict File Operations to Workspace Directory Only
Use CLI configuration. Open your terminal (command line tool) and enter the following command:
# Configure file operations to workspace directory only
openclaw config set tools.fs.workspaceOnly true
Then restart the gateway:
openclaw gateway restartConclusion
Now, your lobster has hands.
It can open browsers, click pages, read and write files in your designated workspace - this sounds simple, but there’s actually a lot it can do behind the scenes.
In the next article, I’ll demonstrate how to connect it to Feishu, so you can remotely “cloud-raise your lobster” no matter where you are.
If you’re interested, follow my channel. I’ll continue updating:
- 🎬 YouTube: lingshunlab
- 📺 Bilibili: 凌顺实验室
References
tools.profile Permissions
https://docs.openclaw.ai/tools#tool-profiles-base-allowlist
In OpenClaw (2026.3.2 and recent versions), tools.profile is the base allowlist for tool permissions. This configuration item strongly affects security: new installations default to "messaging" (a major security upgrade starting from 2026.3.x), while the broad/coding profiles that many users were accustomed to in older versions now need to be explicitly set.
Permission Comparison (Core Differences at a Glance)
| Dimension | minimal | messaging | coding | full |
|---|---|---|---|---|
| File Operations (fs.read/write/edit/apply_patch) | ✗ Completely prohibited | ✗ Prohibited | ✓ Allowed (can be further restricted with fs.workspaceOnly) | ✓ Allowed |
| Shell Execution (exec/runtime/process) | ✗ Prohibited | ✗ Prohibited | ✓ Allowed (can add approvals.exec review) | ✓ Allowed |
| Browser (browser) | ✗ Prohibited | ✗ Prohibited | ✓ Allowed | ✓ Allowed |
| Message/Session Management (sessions_*, messaging group) | session_status only | ✓ Fully supported | ✓ Fully supported | ✓ Fully supported |
| Image/Memory Tools (image, memory_*) | ✗ Prohibited | ✗ Prohibited | ✓ Partially supported | ✓ Fully supported |
| Other High-Risk Tools (cron, gateway, nodes, etc.) | ✗ Prohibited | ✗ Prohibited | ✗ Mostly prohibited (needs allow) | ✓ Possibly open |
| Default New Installation | ✗ Not default | ✓ Yes (2026.3.x major change) | ✗ Requires manual setting | ✗ Requires manual setting |
| Recommended For | Maximum security, chat only | Regular users, beginners, mainly chatting | Developers, heavy code/file users | Testing, POC, when trusting models |