Conquering the CH32V307 on Mac from Scratch: From 'a pile of Windows viruses' to 'the LED blinks and the serial port talks' — a pitfall diary
Building a CH32V307 dev environment on Mac from scratch, only to find PlatformIO's platform hands you a pile of Windows .exe files? This article is a faithful, blow-by-blow record of the real debugging session: manually swapping in a native macOS RISC-V toolchain, clearing the Gatekeeper quarantine, getting the on-board WCH-Link to flash, all the way down to the real root cause behind 'compile and flash both succeed, the serial port prints, but the LED flat-out won't light' — the on-board LED isn't even wired to the MCU at the factory. Every command and error here was actually run; all 10 gotchas I hit are laid out in full, as a heads-up for anyone coming over from Arduino/ESP.
Lingshun Lab · Embedded Pitfall Diary series
Hardware: CH32V307V-EVT-R1 (on-board WCH-Link debugger, a WCH RISC-V chip) OS: macOS (Apple Silicon, arm64) Tools: VSCode + PlatformIO Goal: build the dev environment from zero, blink an LED, and get the serial port to talk — the universally-accepted “Hello World” of the embedded world
Before we start: why this article exists
Let me set the scene and explain “who I am” up front, so that when you see some of the things I do later on, you won’t be muttering “has this guy ever actually written microcontroller code?” —
I’ve been playing with Arduino and ESP-IDF for quite a few years now. Blinking an LED, connecting to WiFi, running MQTT — it’s all muscle memory at this point; I could light up an LED with my eyes closed. So when I first got my hands on this CH32V307 board, my thinking was: “It’s just another chip, how hard can blinking an LED be?”
Reality proceeded to slap me around pretty thoroughly. The “factory defaults” of the CH32 ecosystem are a completely different worldview from the Arduino/ESP land of “plug in, flash, write it right, it lights up”:
- Flashing a program means inviting a dedicated debugger to the party. On Arduino and ESP32, a single USB cable handles power, flashing, and serial all at once. CH32, meanwhile, shoves a board-mounted debugger called wlink at you, and just figuring out “how on earth does this thing push firmware into the chip” sent me around in loops.
- The on-board LED isn’t even connected to the MCU. On an Arduino the on-board LED is hard-wired to pin 13; one
digitalWrite(13, HIGH)and it’s lit. On this board, the user LEDs are… factory-disconnected stubs, not wired to any pin at all. I had to fly a dupont wire over myself before the LED would graciously agree to light up. - The serial port has a specific door you have to knock on. On ESP32, plugging in gives you a USB serial port, WYSIWYG. CH32, by default, goes through USART1 virtualized by the debugger; get the port wrong and you get dead silence, which leaves you staring at an empty monitor wondering whether the board is broken.
That was the moment I truly understood the phrase “a veteran eating humble pie” — after a decade-plus of blinking LEDs, I got stuck on a RISC-V microcontroller hard enough to question my life choices, and almost convinced myself that everything I’d learned about embedded all these years had been for nothing.
So this isn’t just a “tutorial,” it’s a pitfall diary of an Arduino/ESP veteran’s first rodeo with CH32. Every laughably dumb mistake I made — the kind that experienced folks will find absurd — I’m laying out exactly as it happened, because for those of you coming over from Arduino/ESP, you’ll probably step into every one of them too. Consider this a heads-up; once you’ve read it, the pitfalls ahead will feel like old friends.
Persona talk aside, back to the actual topic. If you search “CH32V307 + Windows,” you’ll find WCH’s official MounRiver Studio — install it and you’re off. Search “CH32V307 + Linux” and the official toolchain has you covered just fine.
But search “CH32V307 + macOS” and… you’ll probably fall into a stunned silence. The information is scattered and full of hidden traps. The chip itself is genuinely great — a 32-bit RISC-V core, up to 144MHz, price-performance that beats a whole crowd of ARM microcontrollers — but on Mac it gets absolutely no love.
This article is the full record of me building the CH32V307 dev environment from scratch on Mac: every pitfall I hit, every pitfall I filled, ending with a blinking LED and a working serial port. I won’t skip a single gotcha, because odds are you’ll hit the same ones, and with them all laid out you’ll save yourself a lot of detours. The actual code is on GitHub (link at the end); this article’s job is to nail the “why we do it this way.”
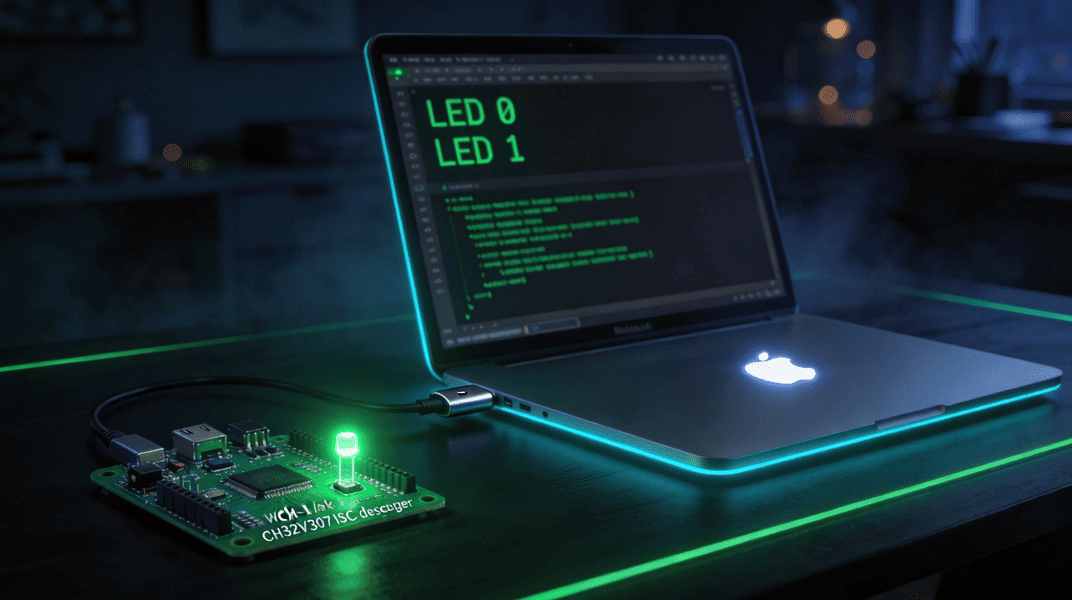
Spoiler for the final result: compile succeeds, flash succeeds, the on-board LED blinks on a steady cadence, and the serial monitor prints in sync:
CH32V307 booted, SystemCoreClock = 144000000 Hz
LED 0
LED 1
LED 0
...
Between “absolutely nothing” and that picture, I hit at least 8 pitfalls. Read on, not one will be skipped.
Table of Contents
- 1. Meet the protagonist: CH32V307V-EVT-R1
- 2. The big picture: what this toolchain looks like
- 3. Getting started: from installing VSCode to meeting the pio command
- 4. Installing the CH32V platform (and the first small gotcha)
- 5. The big gotcha: why did I end up with a pile of .exe files
- 6. Fixing it: swapping in a macOS-native toolchain
- 7. Clearing the Gatekeeper quarantine (or macOS will treat them as ‘viruses’)
- 8. Verifying the toolchain actually runs
- 9. Creating your first project: getting to know platformio.ini
- 10. First compile
- 11. Making pio a global command
- 12. Hardware hookup and flashing
- 13. Gotcha ①: compile and flash both succeed, but the serial port is dead silent
- 14. Gotcha ② (the biggest gotcha in the whole piece): the serial port talks but the LED flat-out won’t light
- 15. Once it works: what the complete main.c looks like
- 16. Pitfall summary table
- 17. Quick reference: commands & file paths
- 18. Building your own ‘CH32 dev mental model’ so you can copy your homework on the next project
- 19. FAQ
- 20. Where to go after it works
- 21. References
1. Meet the protagonist: CH32V307V-EVT-R1
Before we start work, take two minutes to get to know this board, because 90% of the pitfalls later on trace back to its “personality.”
| Feature | Notes |
|---|---|
| Main chip | CH32V307VCT6, WCH QingKe V4F core, 32-bit RISC-V, up to 144MHz, LQFP80 package |
| Actual Flash capacity | 288KB (but PlatformIO compiles against 256KB Flash + 64KB SRAM by default; we’ll explain later why you don’t need to change this) |
| On-board debugger | WCH-Link (actually a CH32V305 chip “moonlighting” as one; behaves the same as the official WCH-LinkE) |
| USB interface | A single USB-C handles power, debugging, and a virtual serial port |
| User LEDs | Two of them, LED1 and LED2 — ⚠️ floating by default, not connected to the MCU! (This is the biggest gotcha of the article, covered in depth in chapter 14) |
| User KEY button | Also floating by default |
| Power indicator LED | One; lights up solid whenever power is applied and has absolutely nothing to do with your code — many people see it light up on power-on and think “I blinked an LED!”, but it’s just a power light |
There’s another easy-to-miss detail on the board: between the on-board debugger chip (CH32V305) and the target chip (CH32V307), 4 jumper caps bridge things at the factory (silkscreen RX1-TX0, TX1-RX0, DIO-DIO0, CLK-CLK0). They carry the debugger’s SWIO signal and serial signal “across the bridge” to the target chip.
⚠️ These 4 jumper caps are installed at the factory — for the love of everything, don’t yank them off. Pull them and at best you won’t be able to flash; at worst the serial port vanishes outright and you’ll be convinced your code is wrong, when really it’s a hardware break. Tracing that for half a day only to find it was the jumpers is soul-crushing — don’t ask me how I know.
OK, introductions done, let’s build the environment.
2. The big picture: what this toolchain looks like
First, a “family portrait” so we know who reports to whom:
┌──────────────────────────────────────────────────────────┐
│  VSCode + PlatformIO IDE extension (GUI: compile/flash/debug/serial) │
│                          │                                │
│                   PlatformIO Core (the pio CLI)             │
│                          │                                │
│            ┌─────────────┴──────────────┐                 │
│       ch32v platform (community: Community-PIO-CH32V)│          │
│            │                             │                 │
│   ┌────────┼─────────┬───────────┐       │                 │
│ toolchain  wlink    openocd    board     │                 │
│(RISC-V GCC)(flasher)(debugger) (board def)│                 │
└──────────────────────────────────────────┘
                     │ USB
        CH32V307V-EVT-R1 (on-board WCH-Link)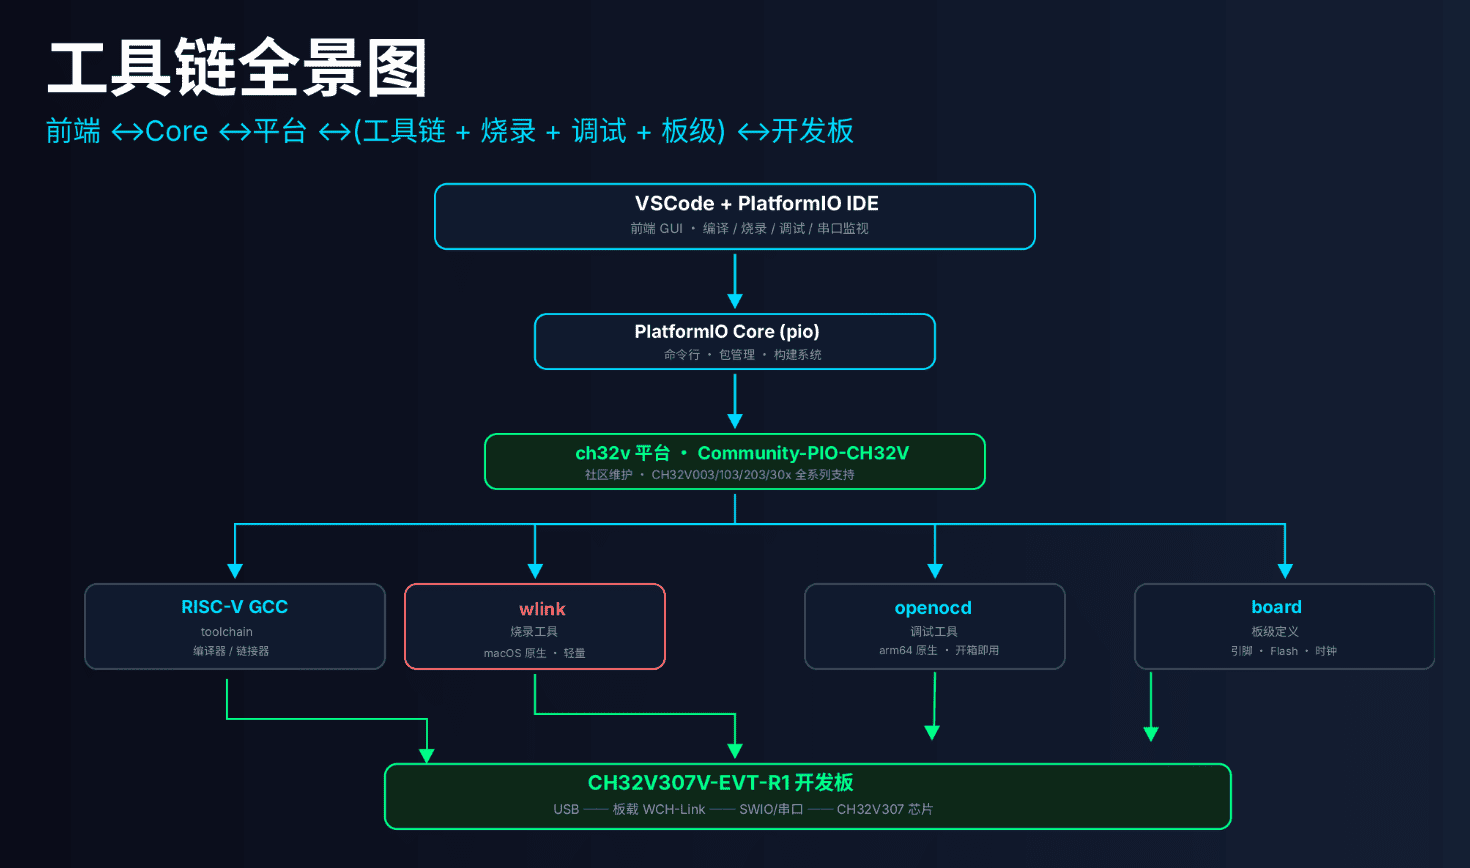
In one sentence: the PlatformIO plugin for VSCode is the front-end UI; the real work is done by the pio command-line tool; pio in turn depends on a community platform called Community-PIO-CH32V, which bundles “compiler (toolchain) + flasher (wlink) + debugger (openocd) + board parameters (board)” together, so in theory one install and you’re set.
This community platform is genuinely fancy — it natively supports the entire CH32V003/103/203/30x range, and offers several development frameworks to choose from: WCH’s official peripheral library (noneos-sdk), FreeRTOS, RT-Thread, Arduino, ch32fun, and more.
But — here’s the biggest twist of the whole piece — this platform is configured by default for Windows users. Once installed on macOS, you’ll most likely sit there dumbfounded. As for the exact flavor of dumbfoundedness, read on.
3. Getting started: from installing VSCode to meeting the pio command
Step 0: confirm the basics
Open a terminal and take inventory:
python3 --version          # needs to be 3.x
brew --version              # Homebrew; not strictly required but strongly recommended
uname -m                    # Apple Silicon should output arm64, Intel Mac outputs x86_64
Then install VSCode + the PlatformIO extension:
- Go to https://code.visualstudio.com/ and download/install VSCode;
- Open VSCode, click the “Extensions” icon on the left → search for
PlatformIO IDE→ Install; - Once the extension installs, it will automatically download the PlatformIO Core itself into
~/.platformio/(a few hundred MB, with its own isolated Python virtual environment). A progress bar shows up in the bottom right; be patient for a few minutes.
When that’s done, an ant icon appears in the left sidebar — that’s PlatformIO’s logo (their mascot really is an ant).
Step 1: find the hidden pio command
Once the extension is installed, the pio command-line tool already exists, it’s just not on your system PATH. Typing pio straight into the terminal won’t find it. It’s actually lying here:
~/.platformio/penv/bin/pioVerify:
~/.platformio/penv/bin/pio --version
# PlatformIO Core, version 6.1.19
To make the commands easier to type, set a temporary variable (only valid in the current terminal window):
PIO=~/.platformio/penv/bin/pioEvery $PIO in the commands below refers to this path. Once everything’s set up, step 9 will turn it into a global command so you can just type pio.
4. Installing the CH32V platform (and the first small gotcha)
Use PlatformIO’s package manager to install the community platform:
$PIO pkg install -g -p https://github.com/Community-PIO-CH32V/platform-ch32v.gitThere are two details here that are easy to trip on:
Gotcha ①: the org name is easy to mistype. The correct GitHub org name is
Community-PIO-CH32V(note the PIO in the middle, and it’s uppercase). Plenty of older articles and posts online write it ascommunity-ch32v(missing the PIO); if you copy that you’ll get a deeply frustrating error:remote: Repository not found.Copy
Community-PIO-CH32Vexactly.
Gotcha ②: using an outdated command. Older tutorials love
pio platform install ..., but in newer PlatformIO this command is deprecated and printsThis command is deprecated. The modern, unified form ispio pkg install -g -p <url>.
The command pulls down the platform itself, the RISC-V toolchain, openocd, and wlink in turn. Everything looks fine, no errors in the log. Hold off on popping the champagne, though — the real gotcha is still ahead.
5. The big gotcha: why did I end up with a pile of .exe files
This is the most valuable section of the article, and it’s exactly where the vast majority of macOS users get stuck and start questioning their life.
With the platform installed, let’s inspect what actually got downloaded locally:
ls ~/.platformio/packages/toolchain-riscv/bin/ | head
# riscv-none-embed-addr2line.exe
# riscv-none-embed-ar.exe
# riscv-none-embed-as.exe
# ...
Now check the flashing tool wlink:
file ~/.platformio/packages/tool-wlink/wlink.exe
# PE32 executable (console) Intel 80386, for MS Windows
See that? All .exe files — bona fide Windows PE32 binaries, which on macOS are dead weight. You can’t even double-click them, let alone compile code with them. My reaction on first seeing this was roughly: “I’m on a Mac and you sent me Windows binaries, what exactly is the idea here?”
Root cause: it’s in platform.json
Open up the platform’s config file and take a look:
cat ~/.platformio/platforms/ch32v/platform.json | python3 -m json.tool | grep -A3 toolchain-riscvHere’s the result:
"toolchain-riscv": {
  "type": "toolchain",
  "owner": "platformio",
  "version": "https://github.com/Community-PIO-CH32V/toolchain-riscv-windows.git"
}
Mystery solved. The platform’s config file hardcodes the toolchain source as toolchain-riscv-windows.git, and the wlink flasher is likewise pinned to the #windows branch. PlatformIO doesn’t do any clever “what OS are you on” detection at install time — whatever the config says, it installs, treating everyone equally, including us poor Mac users.
The good news: that same Community-PIO-CH32V org has had macOS-native repos ready for ages; they just aren’t set as the default. With the root cause nailed down, the fix writes itself — manually swap those two Windows packages for their macOS-native counterparts. Exactly how to swap them, and what to watch out for at each step, is the hands-on walkthrough in the next chapter.
6. Fixing it: swapping in a macOS-native toolchain
6.1 Swap the RISC-V compiler
First delete the wrong Windows version:
rm -rf ~/.platformio/packages/toolchain-riscvThen install the macOS-native version:
$PIO pkg install -g -t https://github.com/Community-PIO-CH32V/toolchain-riscv-mac.gitOn success it prints something like:
Tool Manager: [email protected]+sha.99cb62f has been installed!Once installed you can confirm: its package.json says "system": ["darwin_x86_64", "darwin_arm64"], proving it’s for macOS, and the package name is still toolchain-riscv, so it slots in seamlessly as a drop-in replacement for the Windows version.
Why use the
mainbranch here instead of the seemingly newergcc12branch?There’s a sneaky technical detail here. The platform’s build script (
builder/main.py) has this logic:is_gcc_12 = platform.get_package_version("toolchain-riscv").split(".")[1].startswith("12") compiler_triple = "riscv-wch-elf" if is_gcc_12 else "riscv-none-embed"In plain English: the script looks at the second segment of the toolchain’s version number; if it’s
1.8.xstyle, it assumes your compiler executable prefix isriscv-none-embed-gcc; if it’s1.12.x, it assumes the prefix isriscv-wch-elf-gcc. These two prefixes correspond to entirely different executable filenames — pick wrong and the build script ends up invoking a command that doesn’t exist on disk, and it errors out immediately.The version number the
mainbranch installs happens to be1.80200.190731(corresponding to gcc 8.2.0), identical to the Windows version the platform pins by default, which triggers theriscv-none-embedcodepath — exactly what the script originally expected. Zero risk, the safest option.
After install, one detail to note:
⚠️ This gcc8 compiler is actually an x86_64 binary — built for Intel Macs, not Apple Silicon-native arm64. The reason is simple: xPack (the upstream packager) hadn’t shipped arm64 builds back in the gcc8 era. So on an M-series Mac this compiler runs translated through Rosetta 2. Sounds less than “native,” but in practice it compiles completely fine — no need to stress about it. The first time you run it, the system will prompt you to install Rosetta; just agree and you’re done.
6.2 Swap the flashing tool wlink
Same operation, swap the Windows wlink for the macOS-native one:
rm -rf ~/.platformio/packages/tool-wlink
$PIO pkg install -g -t https://github.com/Community-PIO-CH32V/tool-wlink.git#mac_arm64
If you’re on an older Intel Mac, change the branch name to
mac_x64:$PIO pkg install -g -t https://github.com/Community-PIO-CH32V/tool-wlink.git#mac_x64
Once installed it prints:
Tool Manager: [email protected]+sha.0c802d4 has been installed!openocd is fine, leave it alone.
openocd(the debugging tool) comes from PlatformIO’s official registry, not directly fromCommunity-PIO-CH32V, and the registry already auto-matches the right architecture per OS — so on Apple Silicon it’s already an arm64 native build. You can verify:file ~/.platformio/packages/tool-openocd-riscv-wch/bin/openocd # Mach-O 64-bit executable arm64 ✅ don't worry, this one's fine
6.3 Important correction: the actually-stable setup is gcc12 / arm64-native
I have to insert a frank admission right here — a self-correction. The “why use the main branch (gcc8)” reasoning in 6.1 above was a theoretical judgment I reached early on by reading the build-script code. The script logic itself isn’t wrong, but “which version is actually stable to install” can’t be answered by code-guessing alone — at the end of the day you have to actually compile, flash, and run it on real hardware to know for sure.
Tracing back the environment that actually succeeded end-to-end at on-board compile/flash/run, the result is: the version that’s genuinely stable, useful, AND Apple Silicon-native arm64 (no Rosetta translation needed at all) is gcc 12.2.0, with the executable prefix riscv-wch-elf-gcc. My earlier worry about “the gcc12 branch being a minefield, the corresponding executable might not exist” turned out to be unfounded in practice — not only does this toolchain exist, it’s the most complete, newest, smoothest-running one of the bunch, and it even bundles the GDB debugger, all in one install.
So the conclusion flips: if you’re installing right now, target gcc 12.2.0 / arm64-native / riscv-wch-elf-gcc. Treat the gcc8/x86_64-on-Rosetta path from 6.1 as a fallback note — “if you happen to end up with that version, don’t panic, it works too” — no need to chase it on purpose.
The reason I’m leaving this “guessed wrong and walked it back” process intact in the article, instead of quietly editing it away as if it never happened, is that it’s a genuinely valuable lesson: reading the build script and the version-number pattern helps you understand “why things are this way,” but for the conclusive question of “which version should I actually install,” you ultimately have to verify by compiling and flashing for real. Pure code reasoning can lead you to an overly conservative conclusion.
6.4 Final environment confirmation: full technical spec
The table below is the complete info, exhaustively dug out of the environment that actually compiled and uploaded successfully. Treat this config as the target to check against:
| Category | Component / Field | Value |
|---|---|---|
| Compiler | Name | xPack GNU RISC-V Embedded GCC (WCH-customized build, the same one bundled with MounRiver Studio) |
| Compiler | Executable name | riscv-wch-elf-gcc (whole suite shares the riscv-wch-elf- prefix) |
| Compiler | GCC version | 12.2.0 |
| Compiler | Target triple | riscv-wch-elf |
| Compiler | Build/run host | aarch64-apple-darwin23.6.0 (Apple Silicon-native, not via Rosetta) |
| Compiler | Default ABI | ilp32 (32-bit, soft-float calling convention) |
| Compiler | Default ARCH | rv32imac (I integer / M mul-div / A atomics / C compressed) |
| Compiler | ISA spec | 2.2, multilib enabled |
| Compiler | Thread model | single (bare-metal, no OS) |
| Compiler | C standard library | newlib 4.2.0 (this is what provides printf and other stdlib functions) |
| Compiler | binutils (assembler/linker suite) | GNU binutils 2.38 (as, ld.bfd, objcopy all come from here) |
| Compiler | Debugger | riscv-wch-elf-gdb is already bundled — no extra install needed |
| Compiler | Binary path | ~/.platformio/packages/toolchain-riscv/bin/ |
| Compiler | sysroot | ~/.platformio/packages/toolchain-riscv/riscv-wch-elf/ |
| Compiler | PIO package name / version | toolchain-riscv @ 1.120200.220829 |
| Compiler | Source | xPack (riscv-none-elf-gcc-xpack), built on upstream GCC 12.2.0 |
| Build env | PlatformIO Core | 6.1.19 |
| Build env | Platform platform-ch32v | 1.1.0 (maintained by Community-PIO-CH32V) |
| Build env | Framework framework-wch-noneos-sdk | 2.30000.0 (WCH standard peripheral library, bare-metal) |
| Build env | Build system | PlatformIO built-in (SCons + Python based) |
| Build env | Target chip | CH32V307VCT6, ChipID 0x30700568, QingKe V4F @144MHz |
| Upload env | Upload tool | wlink 0.1.1 (the one actually in use; PIO package tool-wlink @ 0.23.241116) |
| Upload env | Upload protocol | wlink (corresponds to the upload_protocol setting in platformio.ini) |
| Upload env | Debugger firmware | WCH-Link v2.18 (v38), hardware based on CH32V305 |
| Upload env | Alternative: OpenOCD | 0.11.0+dev-snapshot (2026-02-28), PIO package 2.1100.260228 |
| Upload env | Alternative: wchisp | 0.2.3, PIO package 0.23.240914 |
| Upload env | Alternative: minichlink | 0.1.0 |
Don’t confuse the two: the actual compiler version is GCC 12.2.0;
1.120200.220829is just PlatformIO’s own numbering for the package (roughly1.+12.2.0+0+ the pack date220829), not the compiler’s version number. Don’t mix them up.
Complete toolchain suite (all sharing the riscv-wch-elf- prefix; 30 executables in total, all installed at once):
- Common compile/link:
gccg++c++cppldld.bfdas - Binary handling:
objcopyobjdumpreadelfnmsizestripstringsaddr2line - Archive tools:
arranlibgcc-argcc-nmgcc-ranlib - Debug/analysis:
gdbgdb-py3gprofgcovgcov-toolgcov-dump - Others:
gfortranelfeditc++filtlto-dump
You don’t need to memorize this list — keep it as a reference. For example, later on if you want to see how much flash a function takes after compilation, reach for riscv-wch-elf-size; to disassemble the generated instructions, use riscv-wch-elf-objdump -d. All of these tools are already quietly sitting in ~/.platformio/packages/toolchain-riscv/bin/ from the moment you finished installing the toolchain.
6.5 Tracking and upgrading the compiler: where to find the latest, how to upgrade
The toolchain isn’t a one-and-done install — the community version keeps getting updates. But to understand “how to chase the latest,” you first have to wrap your head around an easily-confusing reality: your compiler is a “three-layer nesting doll,” and there are two different “latest” versions.
First, understand: the three layers + two “latest”
| Layer | What it is | Current latest | Update cadence |
|---|---|---|---|
| ① What PIO actually uses (WCH-customized) | Carries the riscv-wch-elf triple + WCH’s exclusive patches for the QingKe core |
GCC 12.2.0 (this is what you installed) | Hardly moves; parked at 12.2.0 long-term |
| ② The packager of ① | Community-PIO-CH32V repackages ① as a PIO package | Same (release name riscv-none-embed-gcc 12.2.0-3) |
Tracks ① |
| ③ Topmost upstream (vanilla) | xPack’s general-purpose RISC-V GCC, no WCH patches | GCC 15.2.0 (2025-10-23) | Continuously updated, closely follows upstream GNU GCC |
Key reminder: when people online say “the community version keeps updating,” they mean layer ③ (xPack, already at 15.2.0), NOT layer ① that CH32V actually uses (the WCH-customized build, still parked at 12.2.0). These two lines must not be mixed — directly swapping in xPack 15.2.0 to replace your current compiler would drop the WCH-specific patches for the QingKe core, and certain CH32V features might stop working. For CH32V dev, the correct move is to track ①②, not blindly chase ③’s latest.
Bonus skill: your compiler’s full identity string
riscv-wch-elf-gcc (xPack GNU RISC-V Embedded GCC arm64) 12.2.0is readable at a glance —wch-elfis the WCH-customization marker,xPackis the upstream packager, andarm64means it’s Apple Silicon-native.
How to check exactly which version you have installed
# 1. Check the PIO package version (PlatformIO's own number; not the same thing as the compiler version)
pio pkg list | grep -i riscv

# 2. Check the compiler's full identity (version, target triple, ABI, ARCH, build host all included; this is the one worth memorizing)
~/.platformio/packages/toolchain-riscv/bin/riscv-wch-elf-gcc -v

# 3. Check the C library (newlib) version — printf is its doing
grep "_NEWLIB_VERSION" ~/.platformio/packages/toolchain-riscv/riscv-wch-elf/include/_newlib_version.h

# 4. Check the binutils (assembler/linker) version
~/.platformio/packages/toolchain-riscv/bin/riscv-wch-elf-ld.bfd --version

# 5. Check which source platform.json "pins" the toolchain to (decides which repo gets pulled on upgrade)
grep -A3 '"toolchain-riscv"' ~/.platformio/platforms/ch32v/platform.json
Where to find the latest (three channels, ranked by relevance to you)
- Channel 1: WCH official / MounRiver (the true upstream of the WCH-customized build; most relevant). The
riscv-wch-elftriple and the WCH core patches originate from WCH’s official MounRiver Studio — your compiler’s build info even has a build path of/Users/mrs/...(mrs = MounRiver Studio), which is exactly this source. The official download page iswww.mounriver.com(look for “MounRiver Studio” and “Toolchain”). The official SDK repos live atgithub.com/openwch. The current MRS toolchain version line is v1.91 (the Community-PIO-CH32V release notes literally say “Update toolchain to v1.91”). - Channel 2: Community-PIO-CH32V packaged version (what PIO actually uses). It’s essentially a repackaging of MounRiver’s WCH toolchain into a PlatformIO package, so watching its releases tells you first when the PIO side catches up:
github.com/Community-PIO-CH32V/toolchain-riscv-windows/releases. For instant notifications, hit Watch → Custom → Releases in the top-right of the page, or subscribe to the RSS feed:github.com/Community-PIO-CH32V/toolchain-riscv-windows/releases.atom. - Channel 3: xPack upstream (vanilla, fastest updates, for awareness only): releases at
github.com/xpack-dev-tools/riscv-none-elf-gcc-xpack/releases, full version history atnpmjs.com/package/@xpack-dev-tools/riscv-none-elf-gcc, currently latest 15.2.0-1.1.
How to upgrade (and one gotcha you must dodge)
# Upgrade the entire ch32v platform (including frameworks and toolchain — only really updates when Community-PIO-CH32V ships a new version)
pio pkg update -g -p https://github.com/Community-PIO-CH32V/platform-ch32v.git

# Or upgrade just the toolchain package alone
pio pkg update -g -t toolchain-riscv
⚠️ The gotcha to dodge on upgrade (echoes chapter 19 FAQ Q3): as we dug up in chapter 5,
platform.jsonhardcodes the Windows repo as the toolchain source. That means once you runpio pkg updateor reinstall the platform, it may well overwrite your hard-won macOS-native swap back to the Windows version. If it happens, just walk through the swap steps in 6.1 / 6.2 again; for a permanent fix, fork the platform repo yourself, changeplatform.jsonto point at the macOS version by default, and root-cause it once and for all.One more emphasis on direction: upgrading is about getting the new WCH-customized toolchain that Community-PIO-CH32V ships — NOT chasing xPack’s 15.2.0. For CH32V in PIO, always treat ①② (the WCH-customized build) as the source of truth.
7. Clearing the Gatekeeper quarantine (or macOS will treat them as ‘viruses’)
macOS has a security mechanism: any executable picked up over the network (and git clone counts) gets tagged with a quarantine attribute called com.apple.quarantine. If those files aren’t Apple-signed, the system blocks them outright at runtime, usually with an error like:
"xxx" cannot be opened because the developer cannot be verifiedOr, more bluntly:
killed: 9The compiler and flasher we just installed are textbook examples of “unsigned, downloaded over the network,” so clear the quarantine attribute up front:
xattr -dr com.apple.quarantine ~/.platformio/packages/toolchain-riscv
xattr -dr com.apple.quarantine ~/.platformio/packages/tool-wlink
xattr -dr com.apple.quarantine ~/.platformio/packages/tool-openocd-riscv-wch
-ris the recursive flag and clears the quarantine attribute on every file in the directory; even if a file doesn’t have the attribute, the command won’t error — consider it a “doesn’t hurt to do it first” preventive measure, fire away with confidence.
8. Verifying the toolchain actually runs
After install, don’t rush into a project — spend ten seconds confirming the three big pieces actually execute:
# Compiler (per the final version confirmed in chapter 6: gcc 12.2.0, arm64 native, no Rosetta needed)
~/.platformio/packages/toolchain-riscv/bin/riscv-wch-elf-gcc --version
# riscv-wch-elf-gcc (xPack GNU RISC-V Embedded GCC arm64) 12.2.0

# If you happened to install the older gcc8/x86_64 version, swap the command and output accordingly:
# ~/.platformio/packages/toolchain-riscv/bin/riscv-none-embed-gcc --version
# riscv-none-embed-gcc (xPack GNU RISC-V Embedded GCC x86_64) 8.2.0

# Flashing tool (native arm64)
~/.platformio/packages/tool-wlink/wlink --version
# wlink 0.1.1

# Debugging tool (optional, native arm64)
~/.platformio/packages/tool-openocd-riscv-wch/bin/openocd --version
A small Rosetta note: the gcc12/arm64-native build theoretically doesn’t need Rosetta at all. But if you happened to install the older gcc8/x86_64 version, the first invocation may pop a dialog asking whether to install Rosetta 2 — agree, install, done. It’s a one-time prompt and you won’t see it again after that. As long as the commands above spit out version numbers normally, your environment is wired up.
9. Creating your first project: getting to know platformio.ini
9.1 What a project looks like
A minimal PlatformIO project skeleton is just two things:
ch32v307-test/
├── platformio.ini      # the project config; "which chip, which framework, how to flash" — all lives here
└── src/
    └── main.c           # your firmware code, the program entry point
You can also create an empty project from the CLI (clicking “New Project” in VSCode works exactly the same way):
$PIO project init -d ~/ch32v307-test --board ch32v307_evt9.2 platformio.ini, line by line
This is the single most important config file in the project — you’ll tangle with it on every new project, so it’s worth a thorough, line-by-line walkthrough. The contents look roughly like this:
[env]
platform = ch32v
framework = noneos-sdk
monitor_speed = 115200
; On-board WCH-Link debugger; wlink is the flashing tool with native macOS arm64 support
upload_protocol = wlink

[env:ch32v307_evt]
board = ch32v307_evt
; EVT-R1 factory default: Flash 256K + SRAM 64K (matches the board default, no override needed)
; To switch to 288K Flash / 32K SRAM or other layouts, first change the option bytes with the WCH tool,
; then uncomment here to sync:
; board_upload.maximum_size = 294912
; board_upload.maximum_ram_size = 32768
One by one:
[env]: the “common config zone”; everything under it applies to every environment (env). If your project eventually needs to support several different boards, putting shared parameters here saves duplication.platform = ch32v: tells PlatformIO which platform to use — i.e. theCommunity-PIO-CH32Vcommunity platform we spent all that effort installing.framework = noneos-sdk: pick WCH’s official standard peripheral library (bare-metal, no OS scheduling). This is the most classic, best-documented beginner framework; the corresponding package isframework-wch-noneos-sdk, and the version confirmed working in this article is2.30000.0. If you want to play with multitasking later, swap this line forfreertosorrt-thread— the rest of the config basically doesn’t need to change. That flexibility is one of the perks of the PlatformIO ecosystem.monitor_speed = 115200: the baud rate used by the serial monitor (pio device monitor). This number must match the argument you pass toUSART_Printf_Init()in code; mismatch and the serial output is a wall of garbled junk — a classic beginner gotcha.upload_protocol = wlink: tells PlatformIO which tool to use to flash the board. There’s more than one option (full comparison in chapter 12); for macOS arm64 userswlinkis the least hassle, since it’s the natively supported one.[env:ch32v307_evt]: a concrete “environment” definition; the name is up to you, but conventionally it lines up with the board model for easier management.board = ch32v307_evt: specifies the exact board model. PlatformIO loads the corresponding pin definitions, Flash/RAM sizes, default clocks, and a whole suite of parameters based on this.- The Flash/RAM comment lines: there’s a detail here that tends to torment people — the chip on the EVT-R1 actually has 288KB of Flash, but
boarddefaults to 256KB. Don’t rush to change it; it’s not a bug: the factory default option bytes partition things as 256KB Flash + 64KB SRAM, which matches theboarddefault exactly, so as a beginner you don’t need to touch those two commented lines. Only later, when you genuinely need to fill all 288KB of Flash, do you need to first change the chip’s option bytes with WCH’s official tool, then come back here and sync these two lines — that’s an advanced operation, fine to ignore at the beginner stage.
9.3 Reading PlatformIO’s generated main.c template — building a “CH32 dev mental model”
This section is the highlight of the highlights. The first time you open PlatformIO’s auto-generated main.c, a lot of people get scared off by the giant blob of #if defined(...) at the top and think “this is way too complicated.” Don’t panic — let’s pull it apart and you’ll see it’s not that scary. And once you understand that blob, you’ll instantly get the pattern for any WCH chip you switch to later.
The template opens like this (excerpted):
// 1. Auto-pick the header for the current chip based on compile-time macros
#if defined(CH32V003)
#include <ch32v00x.h>
#elif defined(CH32V10X)
#include <ch32v10x.h>
#elif defined(CH32V30X) || defined(CH32V31X)
#include <ch32v30x.h>
// ... followed by a long string of branches for V20X / X035 / L103 / H417 etc.
#endif
#include <debug.h>   // ← this line is the key: it provides serial init, delays, and printf redirection
Why does this code look like this? Because PlatformIO’s template is a single generic main.c for the entire WCH chip lineup — CH32V003, CH32V307, CH32X035, dozens of chips sharing the same main.c skeleton, using a pile of #if defined(...) to “guess” at compile time which chip you’re using, then #include the matching vendor header. These macros are defined for you automatically behind the scenes by the platform = ch32v + board = ch32v307_evt config — you don’t write them by hand.
For our CH32V307, the lines that actually take effect are just two:
#include <ch32v30x.h>   // CH32V30X family peripheral definitions (registers, GPIO_InitTypeDef, etc. all come from here)
#include <debug.h>      // the crucial debug-helper library
Once you understand that, the entire #if defined blob stops being “complex logic” and becomes “a multi-way selector switch.” Get this pattern and you won’t panic when you pick up any new CH32-family board and see a similar template. That’s the “CH32 dev mental model”: first figure out which family header the board maps to, then see which helper functions debug.h provides.
9.4 What’s actually inside debug.h
This header ships with WCH’s official SDK and gets used in nearly every CH32 project. Meeting the functions it provides ahead of time will save you a lot of detours:
void Delay_Init(void);                        // initialize the SysTick-style timer used for delays
void Delay_Us(uint32_t n);                    // microsecond delay
void Delay_Ms(uint32_t n);                    // millisecond delay
void USART_Printf_Init(uint32_t baudrate);    // initialize USART1 and redirect printf to it
The companion debug.c (also SDK-bundled, you don’t write it yourself) already implements the _write() function that the C standard library requires, wired up to USART1. This means you don’t need to write any redirection code yourself — just call USART_Printf_Init(115200) once, and from then on any old printf(...) shows up on the serial port. This is one of those features that’s easy for microcontroller newcomers to miss, yet insanely handy. After you fall into the “no serial output” pit later, this one line will leave a deep impression.
9.5 A minimal “compiles but does nothing” example
Before diving into Hello World, let’s look at the most basic blink code, to get a feel for the standard CH32 GPIO workflow:
#include <ch32v30x.h>   // CH32V30X family header; which one is included is decided by the board config
#include <debug.h>

#define BLINKY_CLOCK_ENABLE RCC_APB2PeriphClockCmd(RCC_APB2Periph_GPIOA, ENABLE)

void Delay_Init(void);
void Delay_Ms(uint32_t n);

int main(void)
{
    NVIC_PriorityGroupConfig(NVIC_PriorityGroup_2);   // configure interrupt priority grouping (standard opening move)
    SystemCoreClockUpdate();                          // refresh the system clock variable (also a standard opening move)
    Delay_Init();                                     // initialize the delay subsystem

    GPIO_InitTypeDef GPIO_InitStructure = {0};

    BLINKY_CLOCK_ENABLE;                               // 1. first "power on" the GPIOA peripheral (enable its clock)
    GPIO_InitStructure.GPIO_Pin = GPIO_Pin_0;           // 2. select pin PA0
    GPIO_InitStructure.GPIO_Mode = GPIO_Mode_Out_PP;    // 3. mode: push-pull output
    GPIO_InitStructure.GPIO_Speed = GPIO_Speed_50MHz;   // 4. toggle speed
    GPIO_Init(GPIOA, &GPIO_InitStructure);              // 5. actually write the config into the registers

    uint8_t ledState = 0;
    while (1)
    {
        GPIO_WriteBit(GPIOA, GPIO_Pin_0, ledState);   // set PA0 level to ledState
        ledState ^= 1;                                 // toggle the level, flip next round
        Delay_Ms(500);                                  // wait 500ms to create the "blinking" effect
    }
}
Memorize this fixed four-step GPIO init dance. Every CH32 peripheral init you write later is a variation on this pattern:
- Turn on the clock. The STM32 family (and CH32’s peripheral library style is basically a copy of the STM32 standard library) has a quirk — every peripheral is “unpowered” by default; before using it you have to manually enable the corresponding clock with
RCC_XXXClockCmd(...). Skip this step and the peripheral is a paperweight — no amount of config will make it respond. - Fill in the struct. Declare a
XXX_InitTypeDefstruct and fill in the mode, speed, and other parameters one by one. - Call
XXX_Init(). “Feed” the struct to the matching init function; only then do the parameters actually get written into the chip’s registers. - Do the work in
while(1). Use the corresponding read/write functions (likeGPIO_WriteBit) to drive the peripheral.
OK, theory done. Next we’ll compile and flash for real — and you’ll find that code which is fine in theory still trips over “unexpected” gotchas in practice.
10. First compile
Everything’s ready, run a compile:
$PIO run -d ~/ch32v307-test # or, after cd'ing into the project dir, just pio runThe first compile auto-pulls WCH’s noneos-sdk framework (a full set of peripheral driver sources), which takes a bit — about 30–60 seconds. A successful compile looks like:
Linking .pio/build/ch32v307_evt/firmware.elf
RAM:   [          ]   3.2% (used 2080 bytes from 65536 bytes)
Flash: [          ]   0.7% (used 1728 bytes from 262144 bytes)
Building .pio/build/ch32v307_evt/firmware.bin
========================= [SUCCESS] Took 47.36 seconds =========================
When you see the green [SUCCESS], the entire toolchain — from VSCode, to pio, to the macOS-native compiler — is fully wired up. Worth a round of applause for yourself. Build artifacts live in the .pio/build/ch32v307_evt/ directory:
firmware.elf: carries full debug symbols, used during debugging;firmware.bin: raw binary, this is what gets flashed.
The two progress bars (RAM/Flash usage) are worth watching. After you add printf later, the Flash footprint will jump noticeably — that’s normal, don’t panic. Chapter 13 explains exactly why.
11. Making pio a global command
Typing out the long ~/.platformio/penv/bin/pio every time is a pain, so let’s symlink it into a directory on the system PATH. On Apple Silicon Macs, Homebrew installs into /opt/homebrew/bin by default, and that directory is usually writable for the current user (member of the admin group):
if [ -w /opt/homebrew/bin ]; then
  ln -sf ~/.platformio/penv/bin/pio /opt/homebrew/bin/pio
  ln -sf "/Applications/Visual Studio Code.app/Contents/Resources/app/bin/code" /opt/homebrew/bin/code
fi
Verify:
pio --version      # PlatformIO Core, version 6.1.19
code --version     # VSCode version number
If
/opt/homebrew/binisn’t writable (rare), pick another writable directory of yours, like~/.local/bin, then add it to your shell’s PATH:mkdir -p ~/.local/bin ln -sf ~/.platformio/penv/bin/pio ~/.local/bin/pio echo 'export PATH="$HOME/.local/bin:$PATH"' >> ~/.zshrcRemember to open a new terminal window or run
source ~/.zshrcafter editing~/.zshrcto apply the change.
From now on, anywhere in this article you see $PIO or ~/.platformio/penv/bin/pio, you can just write pio.
12. Hardware hookup and flashing
12.1 Wiring: plug into the right USB port
The EVT-R1 usually has two USB ports. For flashing and debugging, plug into the one connected to the on-board WCH-Link (the board silkscreen generally says DEBUG / Link / WCH-Link), not the one labeled USB-Device. The two ports have completely different functions; plug the wrong one and nothing shows up in the device manager. macOS ships with a built-in CDC serial driver, so plugging in just works — no extra driver install needed. That’s a real comfort compared to Windows.
12.2 The two modes of WCH-Link
The WCH-Link debugger chip has two operating modes: RV mode (serves RISC-V chips) and DAP mode (serves ARM chips). Our CH32V307 has a RISC-V core, so the debugger has to be in RV mode for flashing to work properly. Boards ship in RV mode by default; if flashing keeps failing, use the wlink command or WCH’s official tool to check or switch the mode:
# List currently connected WCH-Link devices
pio pkg exec -- wlink list          # or just `wlink list` if the path is already in your PATH
12.3 The actual flash
Option A: command line
cd ~/ch32v307-test
pio run -t upload
The upload_protocol = wlink from platformio.ini kicks in right here — PlatformIO calls the macOS-native wlink tool, which writes firmware.bin into the chip through the WCH-Link.
Option B: VSCode GUI
Open the project folder, find the row of icons on the bottom-left PlatformIO toolbar, and click the arrow icon (Upload). Same effect as the command line; mouse-leaning folks can go this route.
On a successful flash, wlink prints detailed info about the debugger and chip, which is great reference material:
04:17:53 [INFO] Connected to WCH-Link v2.18(v38) (WCH-LinkE-CH32V305)
04:17:53 [INFO] Attached chip: CH32V30X [CH32V307VCT6] (ChipID: 0x30700568)
04:17:53 [INFO] Chip ESIG: FlashSize(288KB) UID(63-59-9d-a7-14-54-14-55)
04:17:54 [INFO] Flash done
04:17:54 [INFO] Now reset...
The v2.18(v38) on the first line is the firmware version of your WCH-Link debugger itself; line 3 shows the chip’s actual Flash capacity is 288KB (echoing that detail from chapter 9), plus the chip’s unique UID, which may come in handy for product serialization.
12.4 Which flashing protocol to pick
The board definition actually supports several flashing protocols; switch as needed:
| Protocol | Underlying tool | Notes |
|---|---|---|
wch-link |
openocd (0.11.0+dev-snapshot, PIO package 2.1100.260228) |
Default protocol, talks to the WCH-Link through openocd |
wlink |
wlink (tool version 0.1.1, PIO package [email protected]) |
Recommended for macOS users; native, lightweight, fast, and the protocol actually used in this article |
minichlink |
minichlink (0.1.0) |
Another community-maintained lightweight tool, an alternative |
isp |
wchisp (0.2.3, PIO package 0.23.240914) |
Flashes over USB Bootloader mode; requires pulling BOOT0 high to enter the bootloader first; suits scenarios without a WCH-Link |
12.5 Debugging (breakpoints, stepping)
In VSCode, press F5 to launch a debug session (under the hood it’s openocd + RISC-V GDB working together). You can set breakpoints, step through, and inspect variable and register values in real time. The board’s matching SVD register-description file (CH32V307xx.svd) is already specified in the board config, so visual inspection of peripheral registers also works out of the box, no extra setup. This topic could fill another whole article, so I’ll just point at it here — enough to get going.
13. Gotcha ①: compile and flash both succeed, but the serial port is dead silent
Once the toolchain’s working and flashing succeeds, a lot of people figure the job’s done, excitedly open the serial monitor — and are met with disbelief.
Symptom
pio run              # compiles successfully ✅
pio run -t upload    # flashes successfully ✅
pio device monitor   # open the serial monitor → totally blank, not even a ghost
No compile errors, flash confirmed successful, serial monitor definitely connected to that /dev/cu.usbmodem*** (the serial device virtualized by the on-board WCH-Link), and yet you don’t receive a single character. This is the moment you start suspecting the baud rate, the driver, or even that the board is broken.
Root cause: actually super simple
Open the code and it’s instantly clear — the template PlatformIO generates by default doesn’t initialize the serial port at all, and there isn’t a single printf anywhere in the code. It’s purely a “configure GPIO → toggle the level in a while loop → delay” blink-only program. From start to finish it never sends a byte out the serial port, so of course the monitor gets nothing — the circuit isn’t broken, the code just never intended to talk to you.
The serial port virtualized by the on-board WCH-Link (industry calls it VCP, virtual COM port) is bridged by default to the target chip’s USART1 (PA9 = TX, PA10 = RX). The hardware link is completely live — the program just isn’t sending anything out.
Fix: add the init + printf
We already met USART_Printf_Init() from debug.h back in chapter 9; now we use it for real. Two lines of code solve it:
Delay_Init();

// USART1 (PA9/PA10) goes through the on-board WCH-Link's virtual serial port; the SDK's _write already redirects printf here
USART_Printf_Init(115200);
printf("CH32V307 booted, SystemCoreClock = %lu Hz\r\n", SystemCoreClock);
Then add a print inside the while(1) loop so you can see the program running in real time:
while (1) {
    GPIO_WriteBit(BLINKY_GPIO_PORT, BLINKY_GPIO_PIN, ledState);
    printf("LED %u\r\n", ledState);
    ledState ^= 1;
    Delay_Ms(100);
}
Recompile, reflash, and the serial port springs to life:
CH32V307 booted, SystemCoreClock = 144000000 Hz
LED 0
LED 1
LED 0
...
Heads-up: after adding
printf, Flash usage climbs from around 0.7% (1728 bytes) to about 2.8% (~7440 bytes), becauseprintfpulls in the entire string-formatting machinery — that’s normal.printfis never “free”; it’s trading space for debugging experience, nothing to worry about, and no reason to agonize over those few KB.
Next time serial gives you nothing, troubleshoot in this order
Distill the lesson from this round into a general checklist. Save it; next time you hit something similar, just walk down it:
- Does the code actually call
USART_Printf_Initand actually write aprintf? (The single most common and most easily overlooked gotcha in this article — check this first.) - Is the baud rate right? The
USART_Printf_Init(115200)in code must match themonitor_speedinplatformio.ini; if either side changes without syncing the other, you get garbled junk or a blank screen. - Has the WCH-Link’s virtual serial port feature been turned off by accident? (Check in WCH’s official WCH-LinkUtility tool.)
- Are you actually after “the chip turning itself into a USB serial port” (USB CDC)? If so, that’s a completely different firmware path that needs a USB protocol stack — not the same road as the USART1 + WCH-Link bridge described here. Don’t conflate them.
14. Gotcha ② (the biggest gotcha in the whole piece): the serial port talks but the LED flat-out won’t light
This was the single most maddening gotcha of the whole ordeal, because it has almost nothing to do with software — it’s purely a hardware design issue, and no amount of correct code can fix it. Bear with me through this section; it’ll save you at least half an hour of tearing your hair out staring at code.
Symptom
By this point the serial port is printing normally (which proves the firmware is actually running — not stuck, not HardFault’ing), but no LED on the board is blinking.
Root cause: the on-board user LEDs are factory-disconnected stubs
The two user LEDs on this board (silkscreen LED1, LED2) aren’t connected to any MCU pin at the factory — they’re pure stubs, floating. Specifically: only one end is wired to GND; the other end is a lone bare pad or pin header hole, left dangling for you to wire up yourself. This isn’t a one-off quality issue with some particular board — it’s how WCH’s official schematic (CH32V30xSCH.pdf) is designed.
In other words: whether your code is toggling PC1, PD0, or PA0, if you don’t physically run a dupont wire from that pin to the LED pad, the LED will never light. This is a pure hardware problem; no amount of flashy code changes anything.
I’m not the only one who hit this — multiple independent sources corroborate it. The official Zephyr documentation for this board explicitly states “the on-board LEDs are not connected to the SoC by circuit design”; a separate Chinese WCH CH32V307EVT-R1 usage guide also notes that the two user LEDs on the board are not wired to any GPIO pin and require manual wiring to light up. The on-board user KEY button is the same story — also floating, the same trap waiting to be stepped in again.
The one light on the board that’s connected by default and lights the instant you plug in is the power-indicator LED — that solid-on light from the moment you connect USB. It has zero to do with your code and is super easy to mistake for “I blinked an LED!”, when it isn’t controlled by the MCU at all.
Fix: software + hardware, two steps
Step 1: pick which pin to toggle
WCH’s own GPIO sample code habitually uses PA0; it has the most documentation, the most community discussion, and the fewest extra gotchas, so we’ll align our blink pin to PA0:
// The user LED on the EVT-R1 is floating by default (not wired to MCU); bridge PA0 to LED1 with a dupont wire to light it
#define BLINKY_GPIO_PORT GPIOA
#define BLINKY_GPIO_PIN GPIO_Pin_0
#define BLINKY_CLOCK_ENABLE RCC_APB2PeriphClockCmd(RCC_APB2Periph_GPIOA, ENABLE)
⚠️ A knock-on gotcha: if you’re switching from another port (say PC1 from the original template) to PA0, remember to also change the clock-enable line to
RCC_APB2Periph_GPIOA. I fell right into this one for real: I changed only the pin definition, forgot to switch the clock enable to GPIOA, and of course the GPIOA peripheral’s clock never turned on, PA0 didn’t budge, and I spent ages staring at the code logic before realizing it was a textbook “change one thing, miss another” slip. After changing the port config, give all the related macros a complete once-over — don’t change only half.
Step 2: add a physical dupont wire (pick one of two)
- Option A (use the on-board LED1, WCH’s recommended approach): Take a dupont wire, plug one end into PA0 (the hole labeled
A0on the Arduino header), the other end into the pad silkscreenedLED1on the board. You can find the exact pad location in theCH32V30xSCH.pdfschematic inside the EVT resource pack. - Option B (wire up your own LED, the most reliable and intuitive): Take an ordinary LED, in series with a 330Ω–1kΩ current-limiting resistor, across PA0 and GND. Polarity doesn’t even matter — since the code is continuously toggling the level high and low, one of the two directions will light it either way; the only difference is “which half of the cycle is on.”
Once wired up, run pio run -t upload again. LED1 starts blinking on a 100ms cadence, and the serial port prints LED 0 / LED 1 in sync. THAT is the moment “Hello World” is genuinely working. 🎉
Why did WCH design the LEDs as floating? Almost certainly to “give developers more freedom” — you can wire an LED or button to any GPIO you want in your project, instead of being shackled to some factory-hardwired pin. Great intentions, but deeply unfriendly to first-timers, because the first thing you think when you open the board is never “I need to run a wire before I can blink,” it’s “my code must be wrong somewhere.”
A deeper lesson: first figure out software vs. hardware
The real value of this gotcha isn’t the specific “PA0 needs a dupont wire” detail — it’s that it teaches you a general troubleshooting mindset that works across all of embedded debugging:
“No response” does not equal “the code is wrong.” When a peripheral gives you nothing, the first thing to do is find a way to prove “is the firmware actually executing that logic,” not to immediately start grinding on the code. The reason I nailed this down as a hardware issue so quickly was that the serial port had already started printing — normal serial output means the main loop is running normally, not stuck somewhere. Once you’ve confirmed “the software side is working,” the remaining “no response” can basically be pinned to the hardware link. That’s also why I recommend making “get the serial port working” the very first thing you do on any new project — it’s the fastest, most intuitive ruler you have for ruling out failures.
15. Once it works: what the complete main.c looks like
Merge the fixes for the two gotchas above and you get the complete, working code — essentially the original PlatformIO template plus serial init and print statements:
#include <ch32v30x.h>
#include <debug.h>

// The user LED on the EVT-R1 is floating by default (not wired to MCU); bridge PA0 to LED1 with a dupont wire to light it
#define BLINKY_GPIO_PORT GPIOA
#define BLINKY_GPIO_PIN GPIO_Pin_0
#define BLINKY_CLOCK_ENABLE RCC_APB2PeriphClockCmd(RCC_APB2Periph_GPIOA, ENABLE)

void NMI_Handler(void) __attribute__((interrupt("WCH-Interrupt-fast")));
void HardFault_Handler(void) __attribute__((interrupt("WCH-Interrupt-fast")));
void Delay_Init(void);
void Delay_Ms(uint32_t n);

int main(void)
{
    NVIC_PriorityGroupConfig(NVIC_PriorityGroup_2);
    SystemCoreClockUpdate();
    Delay_Init();

    // USART1 (PA9/PA10) goes through the on-board WCH-Link's virtual serial port; the SDK's _write already redirects printf here
    USART_Printf_Init(115200);
    printf("CH32V307 booted, SystemCoreClock = %lu Hz\r\n", SystemCoreClock);

    GPIO_InitTypeDef GPIO_InitStructure = {0};
    BLINKY_CLOCK_ENABLE;
    GPIO_InitStructure.GPIO_Pin = BLINKY_GPIO_PIN;
    GPIO_InitStructure.GPIO_Mode = GPIO_Mode_Out_PP;
    GPIO_InitStructure.GPIO_Speed = GPIO_Speed_50MHz;
    GPIO_Init(BLINKY_GPIO_PORT, &GPIO_InitStructure);

    uint8_t ledState = 0;
    while (1)
    {
        GPIO_WriteBit(BLINKY_GPIO_PORT, BLINKY_GPIO_PIN, ledState);
        printf("LED %u\r\n", ledState);
        ledState ^= 1;
        Delay_Ms(100);
    }
}

void NMI_Handler(void) {}
void HardFault_Handler(void) { while (1) {} }
A word on the two interrupt handlers at the end: NMI_Handler and HardFault_Handler are extremely common “exception backstop” functions on RISC-V/ARM microcontrollers, and the __attribute__((interrupt("WCH-Interrupt-fast"))) modifier tells the compiler “this is an interrupt service routine, please generate code accordingly” (e.g. auto-saving and restoring register state). The implementation here is dead simple — HardFault_Handler just spins in a while(1){} loop. It’s a conservative but effective backstop: if the program really does run off the rails and trigger a hardware exception, it’s better to freeze here than let the chip keep barreling ahead with corrupted state, and freezing makes it easy to attach a debugger and inspect what happened. As your projects grow you can add error logging, an alarm LED, and so on here; for now, knowing its role is enough.
The full project code (including platformio.ini) is on GitHub — link at the end — and you can clone and run it directly.
16. Pitfall summary table
All the gotchas from the whole article, collected in one place for easy lookup:
| # | Symptom | Root cause | Fix |
|---|---|---|---|
| 1 | Installing the platform reports repository not found |
GitHub org name typo; it should be Community-PIO-CH32V (with PIO, uppercase) |
Use the correct org name URL |
| 2 | pio platform install reports deprecated |
Newer PlatformIO uses the pkg subcommand uniformly |
Switch to pio pkg install -g -p <url> |
| 3 (core) | Platform installs fine, but the toolchain directory is full of .exe files; compile inevitably fails |
platform.json hardcodes the toolchain source as the Windows repo; install doesn’t detect the OS |
Delete the Windows version, manually install toolchain-riscv-mac and tool-wlink (the mac_arm64 / mac_x64 branches) |
| 4 | Wrong toolchain branch installed; compile reports the compiler executable can’t be found | The build script auto-selects the compiler prefix based on the second segment of the toolchain version (1.8.x→riscv-none-embed, 1.12.x→riscv-wch-elf); the installed version doesn’t match the executable that actually exists |
First ls to see what executable you actually got, then use the matching one |
| 5 | Running the compiler/flasher reports “developer cannot be verified” or killed: 9 |
macOS tags downloaded, unsigned binaries with the quarantine attribute | xattr -dr com.apple.quarantine <dir> |
| 6 | Worry that the x86_64 compiler will “misbehave” on Apple Silicon | xPack had no arm64 build in the gcc8 era; needs Rosetta 2 translation | Not actually a problem; once Rosetta is installed it compiles perfectly fine |
| 7 | Trying to symlink pio into /usr/local/bin fails |
That directory is owned by root; ordinary users have no write permission | Use /opt/homebrew/bin or roll your own ~/.local/bin and add it to PATH |
| 8 | Compile and flash both succeed, but the serial monitor is totally blank | The template code is a pure blink loop — no serial init, no printf at all |
Call USART_Printf_Init(115200) and use printf normally (the SDK already redirects it to USART1) |
| 9 (biggest) | Serial prints normally, but no LED blinks on the board | The on-board user LEDs are factory-floating, not wired to any MCU pin | Run a dupont wire bridging PA0 to LED1 (or wire your own LED + current-limiting resistor to GND) |
| 10 (derived) | After switching to PA0 the LED still doesn’t light | When changing ports, you forgot to update the matching clock-enable macro | Port definition and clock enable must be updated together; do a full review after the change |
The single biggest takeaway from this ordeal, condensed into one sentence: in embedded dev, “no response” never equals “the code is wrong.” First find a way to separate software issues (is the firmware actually executing that logic) from hardware issues (is the physical link live, is the peripheral actually wired up). Getting the serial port to talk first is the fastest, lowest-hassle move for ruling things out — always prioritize getting it working.
17. Quick reference: commands & file paths
The handful of commands you’ll reach for most in daily dev:
# === Compile / Flash / Monitor ===
pio run                # compile only
pio run -t upload      # compile + flash
pio device monitor      # open the serial monitor (exit with Ctrl+C)

# === Check the WCH-Link debugger firmware version & attached chip info (most useful when troubleshooting connection issues) ===
~/.platformio/packages/tool-wlink/wlink status

# === Check tool versions ===
~/.platformio/packages/tool-wlink/wlink --version    # flashing tool version
pio --version                                          # PlatformIO Core version

# === Check the compiler version (per the final confirmed environment, the prefix is riscv-wch-elf-) ===
~/.platformio/packages/toolchain-riscv/bin/riscv-wch-elf-gcc --version
# If you installed the older gcc8/x86_64 version, swap the filename accordingly:
# ~/.platformio/packages/toolchain-riscv/bin/riscv-none-embed-gcc --version
Typical wlink status output — at a glance you get the debugger firmware version, target chip model, actual Flash capacity, chip UID, and more. Super handy when troubleshooting connections:
[INFO] Connected to WCH-Link v2.18(v38) (WCH-LinkE-CH32V305)
[INFO] Attached chip: CH32V30X [CH32V307VCT6] (ChipID: 0x30700568)
[INFO] Chip ESIG: FlashSize(288KB) UID(63-59-9d-a7-14-54-14-55)
[INFO] Flash protected: false
[INFO] RISC-V ISA(misa): Some("RV32ACFIMUX")
[INFO] RISC-V arch(marchid): Some("WCH-V4F")
If you ever need to upgrade the WCH-Link debugger’s own firmware, you’ll need the official WCH-LinkUtility tool, which currently has a Windows version only — no Mac version. That’s one small regret of the macOS ecosystem not being fully polished yet.
Key file paths, collected for quick lookup when something goes wrong:
| Use | Path |
|---|---|
| PlatformIO Core itself | ~/.platformio/penv/bin/pio |
| Installed platform | ~/.platformio/platforms/ch32v/ |
| Toolchain / flasher / debugger tools | ~/.platformio/packages/{toolchain-riscv,tool-wlink,tool-openocd-riscv-wch} |
| Board definition file | ~/.platformio/platforms/ch32v/boards/ch32v307_evt.json |
| Platform build script (where we dug up the triple logic earlier) | ~/.platformio/platforms/ch32v/builder/main.py |
| Build artifacts | <project dir>/.pio/build/ch32v307_evt/firmware.{elf,bin} |
Key parameters from the ch32v307_evt board definition, summarized:
| Field | Value |
|---|---|
| MCU model | CH32V307VCT6 |
| Main clock | 144 MHz |
| march / mabi (compile target ABI) | rv32imacxw / ilp32 |
| Flash / SRAM (board default) | 256 KB / 64 KB (the chip actually has 288KB Flash; see chapter 9) |
| On-board debugger | WCH-Link |
| USB VID:PID | 1a86:8010 |
| Supported flash protocols | wch-link, wlink, minichlink, isp |
18. Building your own ‘CH32 dev mental model’ so you can copy your homework on the next project
After all that wrestling, the most valuable thing isn’t how many specific commands you’ve memorized — it’s forming a reusable thinking framework. Whether you keep going with CH32V307 or pick up a new CH32-family chip or board, you can follow this same playbook:
- First lock in the “platform + framework + board” trio: these are the
platform,framework, andboardlines inplatformio.ini. Once these three are set, PlatformIO knows where to fetch the toolchain from and which pin definitions to compile against. - After installing the platform, don’t rush into code — check the toolchain’s “nationality.” Especially for community-maintained platforms without official first-party support, the default may only cover Windows or Linux. Right after install,
lsthe toolchain directory andfilethe key binaries to confirm the architecture matches. It’ll save you a ton of debugging time. - When unsigned binaries fail to run, think Gatekeeper first. Errors like
cannot be opened/killed: 9are eight times out of ten the quarantine attribute doing its thing —xattr -dr com.apple.quarantineand move on. - When flash/compile both succeed but a peripheral gives no response, first separate software from hardware. Get the serial port working first — that’s the fastest process-of-elimination move: serial output means the firmware is executing normally; no output means go back and check for a missed init.
- Don’t trust that “user peripherals” on the board are wired up by default. Onboard peripherals like LEDs and buttons are intentionally left disconnected on many eval boards for flexibility. Confirm against the schematic before assuming your code is wrong.
- Lean on
debug.h(or the debug-helper lib your framework provides). Almost every vendor SDK ships delay functions andprintfredirection ready-made — no need to reinvent the wheel. - Version numbers change; the troubleshooting approach is what carries over. Community toolchains keep updating; the exact versions you see when you install won’t match the tutorial, and that’s fine. Understanding “why” matters more than memorizing “what” — this very article is a living example of that.
Keep this framework in mind, and the next time you pick up any new embedded dev board, you can usually find your footing fast by following the same sequence.
19. FAQ
Q1: Why not just use the official MounRiver Studio? Doesn’t it have a Mac version?
A: MounRiver Studio does ship a Mac version, but per community feedback its built-in OpenOCD has plenty of issues on Mac — feels like the Mac side never got serious adaptation and testing. And it’s a relatively closed all-in-one IDE; you can’t control the toolchain version yourself. PlatformIO builds on VSCode, gives you full control over the toolchain, has an active community, and keeps the dev experience consistent across platforms. Worth the detour.
Q2: Can I just install a RISC-V toolchain via Homebrew to save the manual swap?
A: Technically yes, but not recommended for this platform. The platform’s build script locates the toolchain directory through PlatformIO’s package manager (calls like get_package_dir("toolchain-riscv")), so swapping in a Homebrew-installed toolchain means writing extra config to override the default behavior — more hassle than it’s worth. Sticking with the toolchain-riscv-mac package mentioned in this article is the path of least resistance.
Q3: Will the toolchain get reverted to the Windows version the next time I upgrade the platform?
A: Possibly. If you later run pio pkg update or reinstall the whole platform, platform.json still defaults to the Windows repo URL and may overwrite your manual macOS swap. Just walk through the replacement steps in chapter 6 again — or, for a permanent fix, fork the platform repo yourself and edit platform.json to default to the macOS version. One and done.
Q4: Compile throws a link error, or says some compiler command can’t be found — what’s going on?
A: Most likely the toolchain version and the compiler executable prefix are out of sync (gotcha 4 in chapter 16). First confirm what the compiler you actually installed is named (riscv-wch-elf-gcc vs the older riscv-none-embed-gcc), and make sure the command matches the real file. The final environment table in chapter 6 is your reference.
Q5: Flashing reports “WCH-Link device not found” — what now?
A: Troubleshoot in this order: ① confirm you’re plugged into the USB port connected to the WCH-Link, not the USB-Device port; ② confirm the debugger is in RV mode, not DAP mode; ③ run system_profiler SPUSBDataType | grep -A5 1a86 to check whether the system sees the USB device at all (1a86:8010 is the VID:PID of this debugger).
Q6: What chips and frameworks does this platform support? Will it be easy to switch boards later?
A: On the chip side it covers CH32V003/103/203/30x, CH32X035, CH56x/57x/58x/59x, and a whole pile of other models; on the framework side, besides the noneos-sdk used here, it also supports FreeRTOS, RT-Thread, TencentOS, Harmony LiteOS, Arduino, ch32fun, Zephyr, etc. Switching boards is basically just changing the board and framework lines in platformio.ini. The rest of the troubleshooting experience (toolchain architecture, Gatekeeper quarantine, peripherals floating by default) most likely still applies.
20. Where to go after it works
Hello World is just the starting line. Once it works, you can keep exploring:
- Multi-channel GPIO / button interrupts: The on-board user KEY button is also floating; once wired up, you can practice EXTI external interrupts.
- USB CDC: Have the CH32V307 enumerate itself as a USB serial device, no longer relying on the USART1 bridge through the WCH-Link — that’s another firmware path requiring a USB protocol stack, more advanced material.
- Using the full 288KB Flash: Requires first changing the chip’s option bytes with WCH’s official tool, then uncommenting the
board_upload.maximum_sizelines inplatformio.ini. - Getting into FreeRTOS / RT-Thread: Swap
frameworkfor the matching RTOS and experience multitasking scheduling. - Taking debugging seriously: Use OpenOCD + GDB with F5 breakpoint debugging (
pio debug), and build a solid debugging craft.
21. References
- Community-PIO-CH32V platform repo:
github.com/Community-PIO-CH32V/platform-ch32v - macOS toolchain package:
github.com/Community-PIO-CH32V/toolchain-riscv-mac - Toolchain releases (for tracking new PIO-side versions):
github.com/Community-PIO-CH32V/toolchain-riscv-windows/releases - WCH official MounRiver (source of the WCH-customized toolchain + IDE):
www.mounriver.com - wlink (macOS branch):
github.com/Community-PIO-CH32V/tool-wlink(branchesmac_arm64/mac_x64) - Official docs:
pio-ch32v.readthedocs.io - xPack RISC-V GCC (toolchain upstream):
github.com/xpack-dev-tools/riscv-none-elf-gcc-xpack - Original wlink project:
github.com/ch32-rs/wlink - WCH official product page:
www.wch.cn/products/CH32V307.html - OpenWCH official SDK / examples:
github.com/openwch/ch32v307 - The Zephyr official docs note about this board’s floating LEDs
- PlatformIO official docs:
docs.platformio.org
The full project code is synced to GitHub — feel free to clone and run it directly. If you stumble into a new pitfall while wrestling with this that the article doesn’t cover, drop it in the comments — information on doing CH32V on macOS is still way too thin, and every extra person sharing experience is one fewer pitfall for the next person. May your LED light up soon! 🎉
https://github.com/ling3ye/LingShunLAB/tree/main/Handbook/CH32V/CH32V307-EVT-R1/01%20HelloWorld